Chat Bots
About
Minecraft Console Client has a number of default built in Chat Bots (Scripts/Plugins) which allow for various types of automation.
Note
Settings refer to settings in the configuration file
List of built-in Chat Bots
Alerts
Description:
Get alerted when specified words are detected in the chat
Useful for moderating your server or detecting when someone is talking to you.
Settings:
Section:
ChatBot.AlertsAll settings
EnabledDescription:
This setting specifies if the Alerts Chat Bot is enabled.
Available values:
trueandfalse.Type:
booleanDefault:
false
Beep_EnabledNote
This might not work depending on your system or a console (terminal emulator).
Description:
This setting specifies if you want to hear a beep when you get an alert.
Type:
booleanDefault:
true
Trigger_By_WordsDescription:
Triggers an alert after receiving a specified keyword.
Available values:
trueandfalse.Type:
booleanDefault:
false
Trigger_By_RainDescription:
Trigger alerts when it rains and when it stops.
Available values:
trueandfalse.Type:
booleanDefault:
false
Trigger_By_ThunderstormDescription:
Triggers alerts at the beginning and end of thunderstorms.
Available values:
trueandfalse.Type:
booleanDefault:
false
Log_To_FileDescription:
Should the Alerts Chat Bot log alerts into a file.
Available values:
trueandfalse.Type:
booleanDefault:
false
Log_FileDescription:
A path to the file where alerts will be logged if
Log_To_Fileis set totrue.Type:
stringDefault:
"alerts-log.txt"
MatchesDescription:
List of words/strings to alert you on.
Type:
array of stringsExample:
Matches = [ "Yourname", " whispers ", "-> me", "admin", ".com", ]
ExcludesDescription:
List of words/strings to NOT alert you on.
Type:
array of stringsExample:
Excludes = [ "myserver.com", "Yourname>:", "Player Yourname", "Yourname joined", "Yourname left", "[Lockette] (Admin)", " Yourname:", "Yourname is", ]
Anti AFK
Description:
Send a command and sneak on a regular or random basis or make the bot walk around randomly to avoid automatic AFK disconnection.
Settings:
Section:
ChatBot.AntiAFKAll settings
EnabledDescription:
This setting specifies if the Anti AFK Chat Bot is enabled.
Available values:
trueandfalse.Type:
booleanDefault:
false
DelayDescription:
The time interval for execution in seconds.
If the
minandmaxare the same, the time interval will be consistent. However if they are not the same, the plugin will choose a random number betweenminandmax, this is useful if you want to have a random interval to trick anti afk plugins.Format:
{ min = <seconds>, max = <seconds> }Type:
inline table with min and max fields which have type of doubleDefault:
{ min = 60.0, max = 60.0 }
CommandDescription:
Command to be sent.
Type:
stringDefault:
/ping
Use_SneakDescription:
Sometimes you can trick plugins with sneaking or command might not be enough, enable it if you need it.
Type:
booleanDefault:
false
Use_Terrain_HandlingNote
You need to enable Terrain Handling in the settings and it's recommended to put the bot into an enclosure not to wander off. (Recommended size 5x5x5)
Description:
Should the bot use Terrain Handling instead of the command method.
This will enable your bot to randomly move about, thus a better anti afk effect.
Available values:
trueandfalse.Type:
booleanDefault:
false
Walk_RangeDescription:
The range which bot will use to walk around (-X to +X and -Z to +Z, Y is not used).
The bigger the slower the bot might be at calculating the path, recommended 2-5.
Default:
5
Walk_RetriesNote
This happens on each trigger of the task, so it does not permanently switch to alternative method.
Description:
This is the number of times the bot will try to pathfind, if he can't find a valid path for 20 times, he will use the command method.
Default:
20
Auto Attack
Note
You need to have inventoryhandling and entityhandling enabled in order for this bot to work.
Description:
Automatically attacks mobs around you, you can configure it to attack both hostile and passive mobs and only certain mobs or all mobs.
Settings:
Section:
ChatBot.AutoAttackAll settings
EnabledDescription:
This setting specifies if the Auto Attack Chat Bot is enabled.
Available values:
trueandfalse.Type:
booleanDefault:
false
ModeDescription:
Available values:
singleTarget one mob per attack.
multiTarget all mobs in range per attack.
Type:
stringDefault:
single
PriorityDescription:
Available values:
health(prioritize targeting mobs with lower health)distance(prioritize targeting mobs closer to you)
Type:
stringDefault:
distance
Cooldown_TimeDescription:
Controls the delay between attacks. By default, MCC calculates this based on server TPS. Set
Customtotrueto specify your own values:Min— minimum cooldown in secondsMax— maximum cooldown in secondsRandomMode— if enabled, picks a random cooldown betweenMinandMaxfor each attack
Format:
Cooldown_Time = { Custom = <true|false>, RandomMode = <true|false>, Min = <seconds>, Max = <seconds> }Type:
inline tableExample:
Cooldown_Time = { Custom = true, RandomMode = true, Min = 1.0, Max = 2.0 }Default:
{ Custom = false, RandomMode = false, Min = 1.5, Max = 2.5 }
InteractionDescription:
Available values:
AttackJust attack a mob. (Default)
InteractJust interact with a mob.
InteractAtInteract with and attack a mob.
Type:
stringDefault:
Attack
Attack_HostileDescription:
This setting specifies if the Auto Attack Chat Bot should attack hostile mobs.
Available values:
trueandfalse.Type:
booleanDefault:
true
Attack_PassiveDescription:
This setting specifies if the Auto Attack Chat Bot should attack passive mobs.
Available values:
trueandfalse.Type:
booleanDefault:
false
List_ModeDescription:
This setting specifies which mode of the list should Auto Attack Chat Bot use for
Entites_Listsetting.Available values:
whitelist(only attack specified mobs) andblacklist(do not attack specified mobs).Type:
stringDefault:
whitelist
Entites_ListDescription:
A list of mobs which are either whitelisted or blacklisted, the mode is set in
List_Modesetting.You can find the full list of mobs here.
Format:
["<entity type>", "<entity type>", ...]Type:
array of stringsExample:
[ "Spider", "Skeleton", "Pig", ]Default:
[ "Zombie", "Cow", ]
Auto Craft
Note
You need to have inventoryhandling enabled in order for basic crafting in the inventory to work, in addition if you want to use a crafting table, you need to enable terrainandmovements in order for bot to be able to reach the crafting table.
Description:
Automatically craft items in your inventory or in a crafting table.
Commands:
/autocraft listList all loaded recipes.
/autocraft start <name>Start the crafting process with the given recipe name you had defined.
/autocraft stopStop the crafting process.
/autocraft helpIn-game help command.
Settings:
Section:
ChatBot.AutoCraftAll settings
EnabledDescription:
This setting specifies if the Auto Craft Chat Bot is enabled.
Available values:
trueandfalse.Type:
booleanDefault:
false
CraftingTableDescription:
This setting specifies the location of the crafting table.
Type/Format:
This setting is an of an
inline tabletype that has the following sub-options/settings;x- X coordinate, the type isdouble(eg.123.0)y- Y coordinate, the type isdouble(eg.64.0)z- Z coordinate, the type isdouble(eg.456.0)
Example:
CraftingTable = { X = 123.0, Y = 65.0, Z = 456.0 }
OnFailureDescription:
This setting specifies what the Auto Craft Chat Bot should do on failure.
Failure can happen when there are no materials available or when a crafting table can't be reached.
Available values:
abortandwait.Type:
stringDefault:
abort
Defining a recipe
Note
If you're using
tableyou need to set theCraftingTablesetting.The recipes are defines as a separate new sub-section
[[ChatBot.AutoCraft.Recipes]]of the[ChatBot.AutoCraft]section.The
[[ChatBot.AutoCraft.Recipes]]section needs to contain the following settings:NameThe name of your recipe, can be whatever you like.
Type:
stringTypeAvailable values:
playerandtableResultThis is the type of resulting item.
Type:
stringExample:
"StoneBricks"SlotsThis setting is an array/list of material names (strings) that go into an each slot (max 9 elements). Empty slots should be marked with
"Null"Type:
array of stringsFormat:
Slots = [ "<material/item type>", "<material/item type>", ... ]Slots are indexed as following:
2x2(Player)╔═══╦═══╗ ║ 1 ║ 2 ║ ╠═══╬═══╣ ║ 3 ║ 4 ║ ╚═══╩═══╝3x3(Crafting Table)╔═══╦═══╦═══╗ ║ 1 ║ 2 ║ 3 ║ ╠═══╬═══╬═══╣ ║ 4 ║ 5 ║ 6 ║ ╠═══╬═══╬═══╣ ║ 7 ║ 8 ║ 9 ║ ╚═══╩═══╩═══╝
Full Examples:
# Stone Bricks using the player inventory
[[ChatBot.AutoCraft.Recipes]]
Name = "Recipe-Name-1"
Type = "player"
Result = "StoneBricks"
Slots = [ "Stone", "Stone", "Stone", "Stone", ]

# Stone Bricks using a crafting table
[[ChatBot.AutoCraft.Recipes]]
Name = "Recipe-Name-2"
Type = "table"
Result = "StoneBricks"
Slots = [ "Stone", "Stone", "Null", "Stone", "Stone", "Null", "Null", "Null", "Null", ]
Tip
If you have a case where you have to leave some fields empty, use
"Null"to mark them as empty. Example for stone bricks:Slots = [ "Stone", "Stone", "Null", "Stone", "Stone", "Null", "Null", "Null", "Null", ]All item types can be found here.
Make sure to provide materials for your bot by placing them in inventory first.
Auto Dig
Description:
Automatically digs block on specified locations.
Note
You need to have inventoryhandling and terrainandmovements enabled in order for this bot to work.
Note
Since MCC does not yet support accurate calculation of the collision volume of blocks, all blocks are considered as complete cubes when obtaining the position of the lookahead.
Commands:
/digbot start- Starts the digging/digbot stop- Stops the digging
Settings:
Section:
ChatBot.AutoDigAll settings
EnabledDescription:
This setting specifies if the Auto Dig Chat Bot is enabled.
Available values:
trueandfalse.Type:
booleanDefault:
false
ModeDescription:
This setting specifies in which mode the Auto Dig Chat Bot will operate.
Available values:
lookatDigs the block that the bot is looking at.
fixedposDigs the block in a fixed location/position/coordinate.
bothDig only when the block you are looking at is in the "Locations" list.
Type:
stringDefault:
lookat
LocationsDescription:
This setting specifies an array/list of locations which the bot will dig out.
Type/Format:
The type of this setting is an array of inline table which has the following sub-options/settings:
x- X coordinate, the type isdouble(eg.123.45)y- Y coordinate, the type isdouble(eg.64.0)z- Z coordinate, the type isdouble(eg.234.5)
Full example:
Locations = [
   { x = 123.5, y = 64.0, z = 234.5 },
   { x = 124.5, y = 63.0, z = 235.5 },
]
Location_OrderDescription:
This setting specifies in which order the Auto Dig Chat Bot will dig blocks.
Available values:
distanceDigs the block closest to the bot.
indexDigs blocks in the list order.
Type:
stringDefault:
distance
Auto_Start_DelayDescription:
How many seconds to wait after entering the game to start digging automatically.
Set to
-1to disable the automatic start.Type:
floatDefault:
3.0
Auto_Tool_SwitchDescription:
Automatically switch to a more suitable tool from your inventory before digging.
When
Durability_Limitis above zero, tools below that durability threshold are skipped.Available values:
trueandfalseType:
booleanDefault:
false
Apply_Efficiency_EnchantmentsDescription:
Include Efficiency enchantments when Auto Dig calculates how long it should wait before finishing a block break.
Disable this if a server's anti-cheat expects slower mining timing. This only changes MCC's timing calculation; it does not remove the enchantment from your tool.
Available values:
trueandfalseType:
booleanDefault:
true
Apply_Haste_EffectsDescription:
Include Haste and Conduit Power effects when Auto Dig calculates how long it should wait before finishing a block break.
Disable this if a server's anti-cheat does not allow the faster timing. This only changes MCC's timing calculation; it does not remove the effect from your player.
Available values:
trueandfalseType:
booleanDefault:
true
Durability_LimitDescription:
Will not use tools with less durability than this.
Set to
0to disable this durability check.Type:
integerDefault:
2
Drop_Low_Durability_ToolsDescription:
Drop the replaced tool if its remaining durability is below
Durability_Limit.This setting is only useful when
Auto_Tool_Switchis enabled.Available values:
trueandfalseType:
booleanDefault:
false
Dig_TimeoutDescription:
If mining a block takes longer than this value, a new attempt will be made to find a block to mine.
Type:
floatDefault:
60.0
Log_Block_DigDescription:
This setting specifies whether to output logs in to the console when digging blocks.
Available values:
trueandfalse.Type:
booleanDefault:
true
List_TypeDescription:
This setting specifies the mode at which the
Blockssetting is operating.Available values:
whitelist(only dig specified blocks) andblacklist(do not dig specified blocks).Type:
stringDefault:
whitelist
BlocksDescription:
This setting specifies the list of blocks which either should not should not be dug out.
The list of block types can be found here.
Format:
[ "<block type>", "<block type>", ...]Type:
array of stringsExample:
Blocks = [ "DiamondOre", "RedstoneOre", "EmeraldOre", "RedstoneBlock" ]Default:
[ "Cobblestone", "Stone", ]
Auto Drop
Description:
Automatically drop items you don't need from the inventory.
Note
You need to have inventoryhandling enabled in order for this bot to work
Settings:
Section:
ChatBot.AutoDropAll settings
EnabledDescription:
This setting specifies if the Auto Drop Chat Bot is enabled.
Available values:
trueandfalse.Type:
booleanDefault:
false
ModeDescription:
This setting specifies the mode of the auto dropping.
Available values:
includeThis mode will drop any items specified in the list in the
Itemssetting.excludeThis mode will drop any other items than specified in the list in the
Itemssetting.So it would keep the items specified in the list.
everythingDrop any item regardless of the items listed in the
Itemssetting.
Type:
stringDefault:
include
ItemsNote
All item types can be found here.
Description:
This setting is where you can specify the list of items which you want to drop, or keep.
Format:
[ "<item type>", "<item type>", ...]Type:
array of stringsExample:
[ "Totem", "GlassBottle", ]Default:
[ "Cobblestone", "Dirt", ]
Auto Eat
Description:
Automatically eat food when your Hunger value is low.
Note
You need to have inventoryhandling enabled in order for this bot to work
Settings:
Section:
ChatBot.AutoEat
Auto Fishing
Description:
Automatically catch fish using a fishing rod. Bite detection combines bobber movement, bobber velocity, and splash sounds.
Note
You need to have entityhandling enabled in order for this bot to work.
Note
To use the automatic rod switching and durability check feature, you need to enable inventoryhandling.
Note
Note: To adjust the position or angle after catching a fish, you need to enable terrainandmovements.
Tip
A fishing rod with Mending enchantment is strongly recommended.
Steps for using this bot (with the default setting)
- Hold a fishing rod and aim towards the sea before login with MCC
- Make sure
AutoFishisenabledin config file - Login with MCC
- You will be able to see the log "Fishing will start in 3.0 second(s).".
Settings:
Section:
ChatBot.AutoFishingAll settings
EnabledDescription:
This setting specifies if the Auto Fishing Chat Bot is enabled.
Available values:
trueandfalse.Type:
booleanDefault:
false
AntidespawnDescription:
This option may be used in some special cases, so if it has not been modified before, leave the default value.
Available values:
trueandfalse.Type:
booleanDefault:
false
MainhandDescription:
Whether to use the main hand or off hand to hold the rod.
Available values:
true(Main Hand)false(Off Hand)
Type:
booleanDefault:
true
Auto_StartDescription:
Whether to start fishing automatically after joining the game or switching worlds.
Available values:
trueandfalse.Type:
booleanDefault:
true
Cast_DelayDescription:
Wait how many seconds after successfully catching a fish before recasting the rod.
Type:
floatDefault:
0.4
Fishing_DelayDescription:
Effective only when
auto_start = true.After joining the game or switching worlds, wait how many seconds before starting to fish automatically.
Type:
floatDefault:
3.0
Fishing_TimeoutDescription:
How long the fish bite is not detected is considered a timeout. It will re-cast after the timeout.
Type:
floatDefault:
300.0
Durability_LimitDescription:
Will not use rods with less durability than this (full durability is 64).
Set to zero to disable this feature.
Type/Available values: An integer number from
0to64.Default:
2
Auto_Rod_SwitchDescription:
Switch to a new rod from inventory after the current rod is unavailable.
Available values:
trueandfalse.Type:
booleanDefault:
true
Stationary_ThresholdDescription:
For each movement of the fishhook entity (entity movement packet), if the distance on both X and Z axes is below this threshold it will be considered as stationary.
This is to avoid being detected as a bite during the casting of the hook.
If set too high, it will cause the rod to be reeled in while casting.
If set too low, it will result in not detecting a bite.
Type:
floatDefault:
0.001
Hook_ThresholdDescription:
For each movement of the fishhook entity (entity movement packet), if it is stationary (check
stationary_threshold) and its movement on the Y-axis is greater than this threshold, it will be considered to have caught a fish.If it is set too high, it will cause normal bites to be ignored.
If set too low, it can cause small fluctuations in the hook to be recognized as bites.
Type:
floatDefault:
0.2
Enable_Velocity_DetectionDescription:
Enables bite detection using the fishing bobber velocity packet.
This improves reliability when bobber X/Z movement is constrained (for example by blocks near the water surface).
Available values:
trueandfalse.Type:
booleanDefault:
true
Velocity_Hook_ThresholdDescription:
Velocity Y threshold in blocks/tick for velocity-based bite detection.
Values below this threshold are considered a bite. Keep this value negative.
Type:
floatDefault:
-0.2
Enable_Sound_DetectionDescription:
Enables bite detection using nearby splash sounds (
entity.fishing_bobber.splash).Available values:
trueandfalse.Type:
booleanDefault:
true
Sound_DistanceDescription:
Maximum distance in blocks between a splash sound and the tracked bobber to treat it as a bite.
Type:
floatDefault:
5.0
Detection_WarmupDescription:
Delay in seconds after bobber spawn before bite detection starts.
This helps ignore the initial cast-entry splash/motion.
Type:
floatDefault:
1.0
Log_Fish_BobberDescription:
When turned on it will be print a log every time a fishhook entity movement packet is received.
If auto-fishing does not work as expected, turn this option on to adjust
stationary_thresholdandhook_threshold, or create an issue and attach these logs.Available values:
trueandfalse.Type:
booleanDefault:
false
Enable_MoveDescription:
Some plugins do not allow the player to fish in one place for a long time. This setting allows the player to change position/angle after each catch.
Each position is added as a new
[[ChatBot.AutoFishing.Movements]]subsection, more on that bellow.Available values:
trueandfalse.Type:
booleanDefault:
false
Adding a position/movement
Each position/movement is added as a new
[[ChatBot.AutoFishing.Movements]]subsection of[ChatBot.AutoFishing].Available settings/options:
XYZThis setting specifies at location the bot should move to.
The type of this setting is
inline table, that has the following sub-settings/options:x- X coordinate, the type isdouble(eg.123.0)y- Y coordinate, the type isdouble(eg.64.0)z- Z coordinate, the type isdouble(eg.-654.0)
Example:
XYZ = { x = 123.0, y = 64.0, z = -654.0 }facingThis setting specifies at which angle the bot will look at when he arrives to this position/location.
The type of this setting is
inline table, that has the following sub-settings/options:yaw- The type isdouble(eg.12.34)pitch- The type isdouble(eg.-23.45)
Example:
facing = { yaw = 12.34, pitch = -23.45 }
Full example
[[ChatBot.AutoFishing.Movements]]
facing = { yaw = 12.34, pitch = -23.45 }

[[ChatBot.AutoFishing.Movements]]
XYZ = { x = 123.45, y = 64.0, z = -654.32 }
facing = { yaw = -25.14, pitch = 36.25 }
Auto Relog
Description:
Make MCC automatically relog when disconnected by the server, for example because the server is restating.
Settings:
Section:
ChatBot.AutoRelogAll settings
EnabledDescription:
This setting specifies if the Auto Relog Chat Bot is enabled.
Available values:
trueandfalse.Type:
booleanDefault:
false
DelayDescription:
The delay time before joining the server.
If the
minandmaxare the same, the time will be consistent, however, if you want a random time, you can setminandmaxto different values to get a random time. The time format is in seconds, and the type is double. (eg.37.0)Format:
{ min = <seconds (double)>, max = <seconds (double)> }Type:
inline tableExample:
{ min = 8.0, max = 60.0 }Default:
{ min = 3.0, max = 3.0 }
RetriesNote
This might get you banned by the server owners.
Description:
Number of retries.
Use
-1for infinite retries.Default:
-1
Ignore_Kick_MessageDescription:
This settings specifies if the
Kick_Messagessetting will be ignored, if set totrueit will auto relog regardless of the kick messages.Type:
booleanDefault:
false
Kick_MessagesDescription:
A list of words which should trigger the Auto Reconnect Chat Bot.
Format:
[ "<keyword>", "<keyword>", ... ]Type:
array of stringsDefault:
[ "Connection has been lost", "Server is restarting", "Server is full", "Too Many people", ]
Auto Respond
Description:
Run commands or send messages automatically when a specified pattern is detected in the chat.
Warning
Server admins can spoof PMs (
/tellraw,/nick) so enableAutoRespondonly if you trust server admins.Warning
This bot may get spammy depending on your rules, although the global messagecooldown setting can help you avoiding accidental spam.
Settings:
Section:
ChatBot.AutoRespondAll settings
EnabledDescription:
This setting specifies if the Auto Respond Chat Bot is enabled.
Available values:
trueandfalse.Type:
booleanDefault:
false
Matches_FileNote
This file is not created by default, we recommend making a clone of the
sample-matches.iniand changing it according to your needs.Warning
If you want to use variables from this chat bot in scripts, currently that does not work. You will have to use a C# script in that case. We are working on getting this functionality back.
Description:
This setting specifies the path to the file which contains the list of rules for detecting of keywords and responding on them.
To find out how to configure the rules, take a look at the
sample-matches.iniwhich has very detailed examples and a lot of comments.PS: In the future we will document the rules here with examples too.
Type:
stringDefault:
matches.ini
Match_ColorsNote
This feature uses the
§symbol for color matchingDescription:
This setting specifies if the Auto Respond Chat Bot should keep the color formatting send by the server.
You can use this when you need to match text by colors.
List of all color codes: here
Type:
booleanDefault:
false
Chat Log
Description:
Make MCC log chat messages into a file.
Settings:
Section:
ChatBot.ChatLogAll settings
EnabledDescription:
This setting specifies if the Chat Log Chat Bot is enabled.
Available values:
trueandfalse.Default:
false
Add_DateTimeDescription:
This setting specifies if the Chat Log should prepend timestamps to the logged messages.
Available values:
trueandfalse.Default:
true
Log_FileDescription:
This setting specifies the name of the Chat Log file that will be created.
Default:
chatlog-%username%-%serverip%.txt
FilterDescription:
Type of messages to be logged into the file.
Available values:
allAll text from the console
messagesAll messages, including system, plugin channel, player and server.
chatOnly chat messages.
privateOnly private messages.
internalOnly internal messages and commands.
Default:
messages
Discord Bridge
Description:
This Chat Bot allows you to send and receive messages and MCC commands via a Discord channel.
Setup:
In order for this to work you must create a Discord bot on the Discord Developers portal.
First go to Discord Developers portal, click on New Application, fill out the name of your bot and confirm the terms of service and click Create.
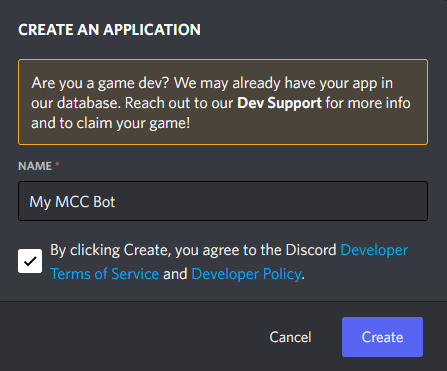
Copy the Application ID and save it somewhere.
Click on the Bot tab in the left menu.
Click on Add Bot

Click on the Reset Token button and copy the generated token, then paste it in the
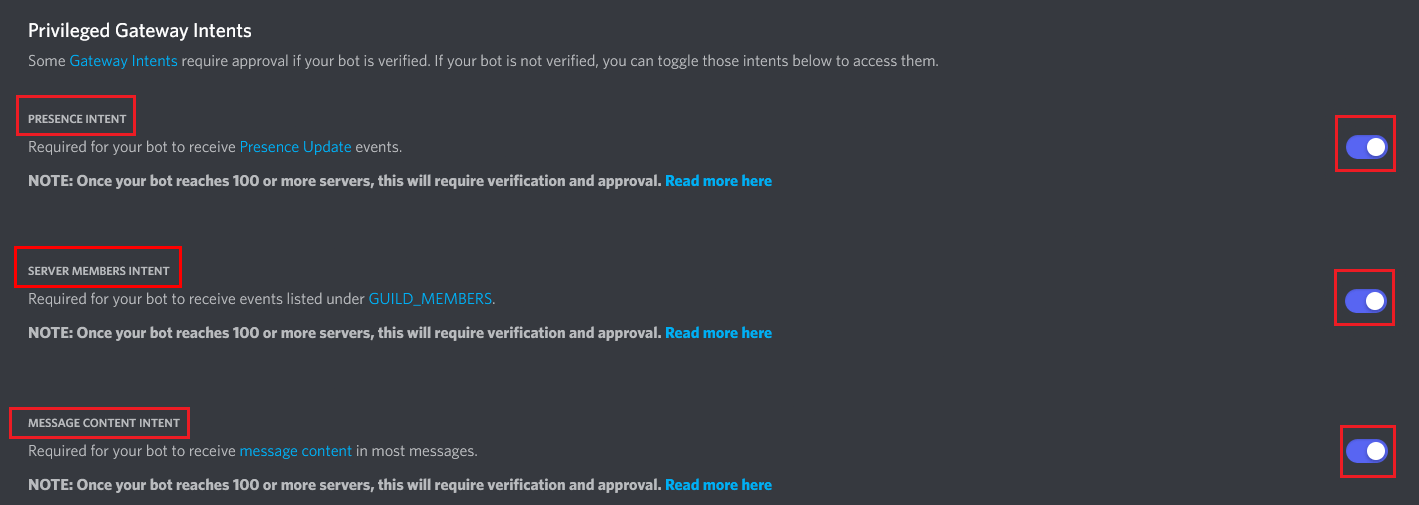
Tokenfield in the MCC configuration.Enable
Message Content Intent,Server Members IntentandPresence Intent.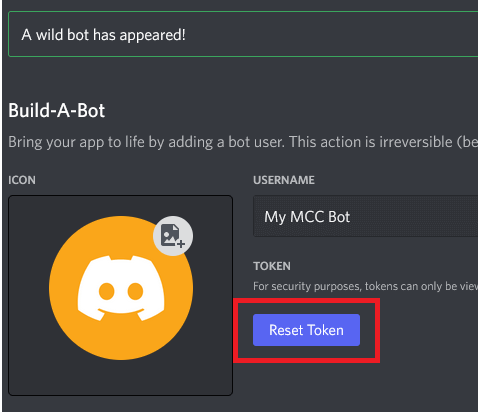
Warning
Token is what gives you access to the Bot, do not share it with anyone and keep it safe!
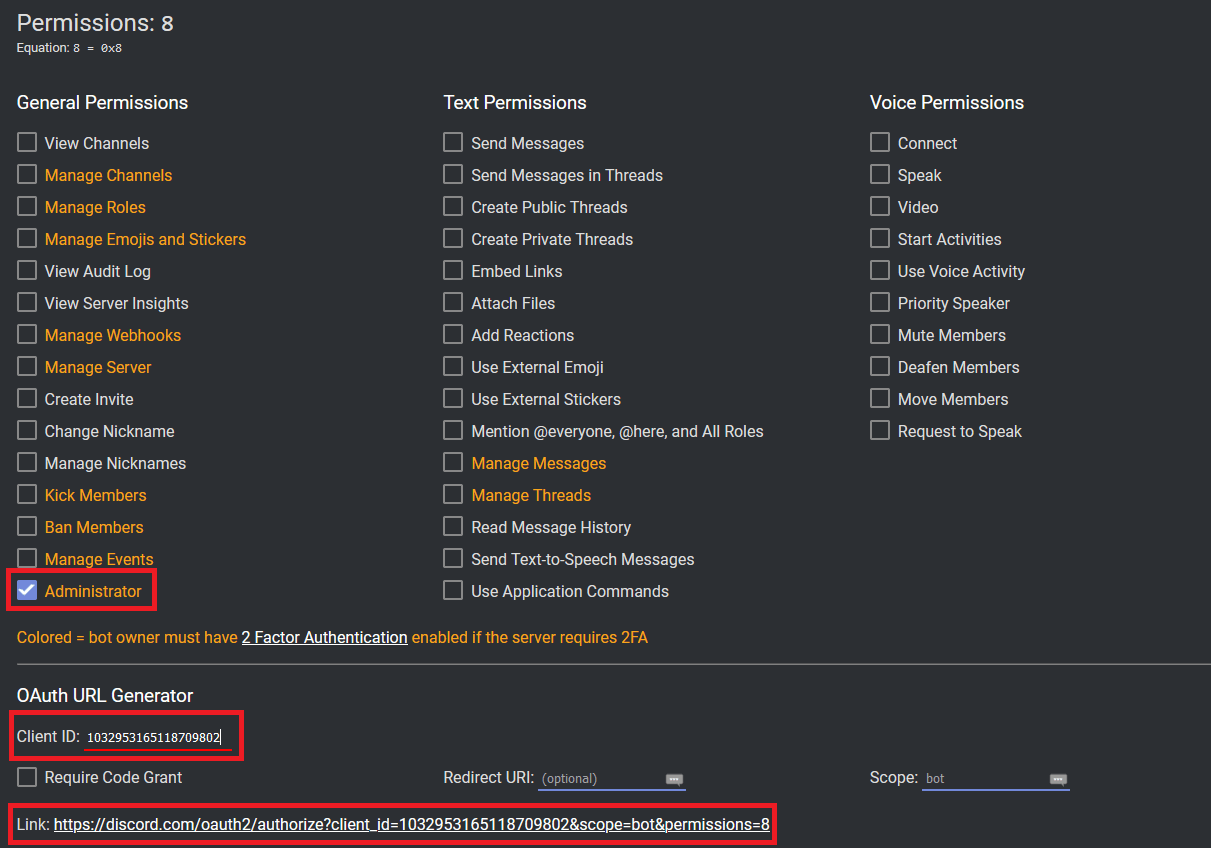
Warning
You must Enable
Message Content Intent,Server Members IntentandPresence Intentfor the bot to work!Then go to Discord Permissions Calculator. Paste the Application Id that you've copied into the Client ID field, then Check/Enable the Administrator field in General Permissions section. Finally click on the Link down bellow and invite the Bot on to a server you want to interact with the MCC on.
Go to your Discord Client and go to Settings -> Advanced, Enable Developer Mode.
Then right click on a server where you invited the bot to in the server list and click on Copy ID, paste the copied id in
GuildIdin your MCC configuration.Then right click on a channel where you want to interact with the bot and click on Copy ID, paste the copied id in
ChannelIdin your MCC configuration.Send a message in that channel and right click on your nick and click Copy ID and paste the copied id in
OwnersIdslist setting in your MCC configuration.Enable the bot by setting
Enabledtotruein your MCC configuration and start the MCC.Usage:
To send a message simply type it out in the Discord channel and press enter.
To execute a MCC command, you must prefix it with a dot (
.). Example:.move 145 64 832Settings:
Section:
ChatBot.DiscordBridgeAll settings
EnabledDescription:
This setting specifies if the Discord Bridge Chat Bot is enabled.
Available values:
trueandfalse.Type:
booleanDefault:
false
TokenDescription:
This is the token of your Discord bot.
Type:
string
GuildIdDescription:
This is the ID of your server/guild where you have invited the bot to.
Type:
unsigned long
ChannelIdDescription:
This is the ID of a channel on your server/guild where you want to interact with the bot.
Type:
unsigned long
OwnersIdsDescription:
This is a list of Discord user IDs which can interact with the bot.
Type:
list/array of: unsigned long
Message_Send_TimeoutDescription:
How long (in seconds) to wait for a message to be sent to Discord before giving up.
Type:
integerDefault:
3
Allow_Other_Bot_MessagesDescription:
When enabled, messages from other Discord bots in the channel are relayed to Minecraft chat. The bridge always ignores its own messages to prevent loops.
Available values:
trueandfalse.Type:
booleanDefault:
false
PrivateMessageFormatDescription:
The format used when someone sends you a private message on the server.
Parts of the message between
{and}are replaced by the Chat Bot at runtime; do not change them.{message}is replaced with the message text,{username}with the sender's name, and{timestamp}with the current date and time.For Discord message formatting, refer to this guide.
Type:
stringDefault:
**[Private Message]** {username}: {message}
PublicMessageFormatDescription:
The format used when sending a public message to the Discord channel.
Parts of the message between
{and}are replaced by the Chat Bot at runtime; do not change them.{message}is replaced with the message text,{username}with the sender's name, and{timestamp}with the current date and time.For Discord message formatting, refer to this guide.
Type:
stringDefault:
{username}: {message}
TeleportRequestMessageFormatDescription:
The format used when someone sends you a teleport request.
Parts of the message between
{and}are replaced by the Chat Bot at runtime; do not change them.{username}is replaced with the requester's name.For Discord message formatting, refer to this guide.
Type:
stringDefault:
A new Teleport Request from **{username}**!
Discord RPC
Description:
This Chat Bot shows your current Minecraft session as a Discord Rich Presence status. It displays information like the server address, your health, current dimension, coordinates, gamemode, and how long you have been connected.
Warning
Discord RPC uses a local IPC socket to communicate with the Discord client. MCC and Discord must be running on the same machine for this to work.
Setup:
You need a Discord Application ID to use this bot. Here is how to get one:
Go to the Discord Developer Portal and click New Application.
Give it a name (this is what shows up in your Discord status, e.g. "Minecraft Console Client"), accept the terms, and click Create.
On the General Information page, copy the Application ID and paste it into the
ApplicationIdfield in your MCC configuration.(Optional) If you want a custom image in your status, go to the Rich Presence tab and click Art Assets. Upload an image and give it a name (the key). Use that key in the
LargeImageKeyorSmallImageKeysettings. The default valuemcc_iconreferences a built-in MCC icon already registered on the application -- no upload needed if you are happy with that.Enable the bot by setting
Enabledtotruein your MCC configuration and start MCC with Discord already running.
Discord updates Rich Presence at most once every 15 seconds regardless of how often MCC sends updates, so you may notice a short delay before your status reflects changes.
Settings:
Section:
ChatBot.DiscordRpcAll settings
EnabledDescription:
This setting specifies if the Discord RPC Chat Bot is enabled.
Available values:
trueandfalse.Type:
booleanDefault:
false
ApplicationIdDescription:
Your Discord Application ID. Create one at discord.com/developers/applications.
Type:
string
PresenceDetailsDescription:
The top line of the Rich Presence display. Supports placeholders (see below).
Type:
stringDefault:
Playing on {server_host}:{server_port}
PresenceStateDescription:
The second line of the Rich Presence display. Supports placeholders (see below).
Type:
stringDefault:
{dimension} - HP: {health}/{max_health}
LargeImageKeyDescription:
The key of the large image asset uploaded to your Discord application. Leave empty to show no image.
Type:
stringDefault:
mcc_icon
LargeImageTextDescription:
Tooltip text shown when hovering over the large image. Supports placeholders (see below).
Type:
stringDefault:
Minecraft Console Client
SmallImageKeyDescription:
The key of the small image asset uploaded to your Discord application. Leave empty to hide the small image.
Type:
stringDefault: (empty)
SmallImageTextDescription:
Tooltip text shown when hovering over the small image. Supports placeholders (see below).
Type:
stringDefault: (empty)
ShowServerAddressDescription:
Show the server address in the Discord presence. When set to
false,{server_host}and{server_port}are replaced withHiddenand****.Available values:
trueandfalse.Type:
booleanDefault:
true
ShowCoordinatesDescription:
Show your coordinates in the Discord presence. When set to
false,{x},{y}, and{z}are replaced with?.Available values:
trueandfalse.Type:
booleanDefault:
true
ShowHealthDescription:
Show health and food level in the Discord presence. When set to
false,{health},{max_health}, and{food}are replaced with?.Available values:
trueandfalse.Type:
booleanDefault:
true
ShowDimensionDescription:
Show the current dimension in the Discord presence. When set to
false,{dimension}is replaced withHidden.Available values:
trueandfalse.Type:
booleanDefault:
true
ShowGamemodeDescription:
Show the current gamemode in the Discord presence. When set to
false,{gamemode}is replaced withHidden.Available values:
trueandfalse.Type:
booleanDefault:
true
ShowElapsedTimeDescription:
Show how long you have been connected to the server as an elapsed time in the Discord presence.
Available values:
trueandfalse.Type:
booleanDefault:
true
ShowPlayerCountDescription:
Show the number of online players as a party size in the Discord presence.
Available values:
trueandfalse.Type:
booleanDefault:
true
UpdateIntervalSecondsDescription:
How often (in seconds) to refresh the Discord presence. Minimum value is
1.Note: Discord itself only accepts presence updates once every 15 seconds, so setting this lower than
15has no visible effect on the Discord side.Type:
integerDefault:
10
Placeholders
The following placeholders can be used in
PresenceDetails,PresenceState,LargeImageText, andSmallImageText:Placeholder Description {server_host}Server hostname (masked if ShowServerAddressisfalse){server_port}Server port (masked if ShowServerAddressisfalse){username}Your Minecraft username {health}Current health (masked if ShowHealthisfalse){max_health}Maximum health, always 20(masked ifShowHealthisfalse){food}Current food level (masked if ShowHealthisfalse){dimension}Current dimension name, e.g. Overworld(masked ifShowDimensionisfalse){gamemode}Current gamemode, e.g. Survival(masked ifShowGamemodeisfalse){x}X coordinate (masked if ShowCoordinatesisfalse){y}Y coordinate (masked if ShowCoordinatesisfalse){z}Z coordinate (masked if ShowCoordinatesisfalse){player_count}Number of players currently online {protocol}Minecraft protocol version number
Farmer
Note
You need to have Terrain And Movements and Inventory Handling enabled in order for this bot to work.
Warning
This bot is still experimental, has some known issues, and should be treated with extra caution on legacy versions.
Description:
This bot can farm crops for you. When you start it it will plant, break and bonemeal crops in order.
Supported crops:
- Beetroot
- Carrot
- Melon
- Netherwart
- Pumpkin
- Potato
- Wheat
Beetroot farming requires Minecraft
1.9+.Current list of issues:
- Sometimes the bot will not bone meal carrots/potatoes or melon/pumpkin stems (you will see it in a pattern of crops that have not been bonemealed)
- Sometimes the bot can jump on to the crops and break the farmland when coming form a different height, it's advised to keep the farming area flat and fenced off so the items to not fly out of the farming area
- If you have a farming platform that is 1 block thick and has air bellow, make it a few blocks thick because the bot can fall through sometimes when logging in and standing on farmland
- Sometimes the bot can be kicked for "invalid movement" packets when farming netherwart on soul sand, we haven't been able to figure why this happens in some parts of the world, while on other it's completely fine, it's advised to keep the farming area small and flat.
We're working on solving these issues.
What the bot does not do as of the time of writing, but are planned features:
- Does not collect items which fly off to the side, (it's advised to fence off the farming area with 2 high wall)
- Does not put items to the chest once the inventory is full
- Does not warn you when the inventory is full
- Does not refill inventory with seeds or bonemeal from chests by it self.
ℹ️ NOTE: The default radius of scanning is
30blocks, we suggest that you do not use radius too big because it might slow down the bot. The bigger the radius, the slower the scanning and processing is.Commands:
When enabled will add the
/farmercommand.Usage:
/farmer <start <crop type> [radius:<radius = 30>] [unsafe:<true/false>] [teleport:<true/false>] [debug:<true/false>]|stop>Options marked with
[and]are optional and in case of this command can have whatever order you prefer after the<crop type>field.Options that have
=means that the value after the=is a default value, in case of this command the default radius is 30 blocks.Examples:
Farming
wheatin a radius of40blocks./farmer start wheat radius:40Farming
melonwith debug output and direct teleporting:/farmer start melon debug:true teleport:trueStopping the bot:
/farmer stopSettings:
Section:
ChatBot.FarmerAll settings
EnabledDescription:
This setting specifies if the Farmer Chat Bot is enabled.
Available values:
trueandfalse.Type:
booleanDefault:
false
Delay_Between_TasksDescription:
This setting specifies the delay in seconds between each task performed by the bot.
Type:
integerDefault:
1Minimum:
1
Follow player
Description:
This bot enables you to make a bot follow a specific player.
Note
The bot can be slow at times, you need to walk with a normal speed and to sometimes stop for it to be able to keep up with you, it's similar to making animals follow you when you're holding food in your hand. This is due to a slow pathfinding algorithm, we're working on getting a better one. You can tweak the update limit and find what works best for you. (NOTE: Do not but a very low one, because you might achieve the opposite, this might clog the thread for terrain handling) and thus slow the bot even more.
Note
You need to have terrainandmovements and entityhandling enabled in order for this bot to work.
Settings:
Section:
ChatBot.FollowPlayerAll settings
EnabledDescription:
This setting specifies if the Follow Player Chat Bot is enabled.
Available values:
trueandfalse.Type:
booleanDefault:
false
Update_LimitDescription:
The rate at which the bot does calculations (second).
You can tweak this if you feel the bot is too slow.
Type:
floatDefault:
1.5
Stop_At_DistanceDescription:
Do not follow the player if he is in the range of
Xblocks (prevents the bot from pushing a player in an infinite loop).Type:
floatDefault:
3.0
Hangman
Description:
Hangman game is one of the first bots ever written for MCC, to demonstrate ChatBot capabilities.
Create a file with words to guess (examples:
words-en.txt,words-fr.txt) and set it in config inside the[Hangman]section.Also set
enabledtotrue, then, add your username in thebotownersINI setting, and finally, connect to the server and use/tell <bot username> startto start the game.Note
If the bot does not respond to bot owners, see the Detecting chat messages section.
Settings:
Section:
ChatBot.HangmanGameAll settings
EnabledDescription:
This setting specifies if the Hangman Chat Bot is enabled.
Available values:
trueandfalse.Default:
false
EnglishDescription:
This setting specifies if the Hangman Chat Bot should use English.
Available values:
trueandfalse.Default:
true
FileWords_ENNote
This settings file is for English and is not created by the default
Description:
This setting specifies the path to the file which Hangman will use for the list of words, each word is added on a separate line.
Default:
hangman-en.txtExample:
words-en.txt
FileWords_FRNote
This settings file is for French and is not created by the default
Description:
This setting is same as the above but for French.
Default:
hangman-fr.txtExample:
words-fr.txt
Mailer
Description:
Relay messages between players and servers, like a mail plugin.
This bot can store messages when the recipients are offline, and send them when they join the server.
The Mailer bot can store and relay mails much like Essential's
/mailcommand./tell <Bot> mail [RECIPIENT] [MESSAGE]: Save your message for future delivery/tell <Bot> tellonym [RECIPIENT] [MESSAGE]: Same, but the recipient will receive an anonymous mail
The bot will automatically deliver the mail when the recipient is online. The bot also offers a /mailer command from the MCC command prompt:
/mailer getmailsShow all mails in the console.
/mailer addignored [NAME]Prevent a specific player from sending mails.
/mailer removeignored [NAME]Lift the mailer restriction for this player.
/mailer getignoredShow all ignored players.
Warning
The bot identifies players by their name (Not by UUID!). A nickname plugin or a Minecraft rename may cause mails going to the wrong player! Never write something to the bot you wouldn't say in the normal chat (You have been warned!).
Warning
Server admins can spoof PMs (
/tellraw,/nick) so enableRemoteControlonly if you trust server admins.Mailer Network:
The Mailer bot can relay messages between servers.
To set up a network of two or more bots, launch several instances with the bot activated and the same database.
If you launch two instances from one .exe they should synchronize automatically to the same file.
Settings:
Section:
ChatBot.MailerEnabledDescription:
This setting specifies if the Mailer Chat Bot is enabled.
Available values:
trueandfalse.Type:
booleanDefault:
false
DatabaseFileDescription:
This setting specifies the path to the file where the Mailer Chat Bot will store the mails.
This file will be auto created by the Mailer Chat Bot.
Default:
MailerDatabase.ini
IgnoreListFileDescription:
This setting specifies the path to the file where the Mailer Chat Bot will load people who are to be ignored by the Chat Bot. If you want to prevent someone from using this chat bot, add him in this file by writing his nickname on a new line.
This file will be auto created by the Mailer Chat Bot.
Default:
MailerIgnoreList.ini
PublicInteractionsDescription:
This setting specifies if the Mailer Chat Bot should be interacted with in the public chat (in addition to private messages).
Available values:
trueandfalse.Type:
booleanDefault:
false
MaxMailsPerPlayerDescription:
This setting specifies how many mails the Mailer Chat Bot should store per player at maximum.
Type:
integerDefault:
10
MaxDatabaseSizeDescription:
This setting specifies the maximum database file size of Mailer Chat Bot in Kilobytes.
Type:
integerDefault:
10000(10 MB)
MailRetentionDaysDescription:
This setting specifies how long should the Mailer Chat Bot save/store messages for (in days).
Type:
integerDefault:
30
MCP Server
Description:
This lets you control MCC from an AI agent such as Claude Code, Codex, Cursor, OpenCode and others.
Once enabled, your AI client can connect to the running MCC session and ask it to do things like read chat, check nearby players, move around, inspect inventories, or interact with entities.
The MCP server starts after MCC joins the game. By default it listens on
http://127.0.0.1:33333/mcp.This bot does not log in to Minecraft on its own. MCC still connects to the server normally first. The MCP part simply gives your AI agent a way to use the session that is already running.
We recommend protecting it with an auth token, even for local use.
Warning
This feature is new and experimental, it still requires a lot of testing and polish. Please leave your feedback on our Discord server.
Warning
The performance of task execution depends on how smart the LLM (Large Language Model) (e.g. Sonnet 4.6, GPT 5.4) and Harness/AI Agent (e.g. Claude Code) are.
Recommended harnesses / agents
- Claude Code
- Codex
- OpenCode
- Cursor
- Open Claw
Recommended models
Model rankings are based on the Agentic Intelligence Benchmark.
Frontier (best results, higher cost):
- Claude Opus 4.6
- GPT 5.4
- GLM-5 -- cheapest in this tier
Open-source (close to frontier, lower cost):
- MiMo-V2-Pro
- MiniMax M2.7 -- cheapest in this tier
- Kimi K2.5
Budget (good for medium and simpler tasks):
- Google Gemini 3 Flash -- recommended
- NVIDIA Nemotron 3 Super: free tier / paid tier / NVIDIA Build -- free tier may hit rate limits; your data is used for model training
- DeepSeek V3.2
Ultra-budget (for very simple tasks):
Settings:
Section:
ChatBot.McpServerQuick start
Enable
ChatBot.McpServer.Set
Transport.RequireAuthToken = true.Export a token before starting MCC:
export MCC_MCP_AUTH_TOKEN="replace-me"Leave
Transport.BindHost = "127.0.0.1"unless you intentionally want to expose the endpoint to other machines.Start MCC and join a Minecraft server.
Connect your AI client to
http://127.0.0.1:33333/mcp.
The embedded host starts after the bot joins the game, not at process launch.
Tool availability still depends on MCC runtime support. Movement, inventory, and entity tools need the corresponding MCC features to be available for the current version and session.
Recommended config
[ChatBot.McpServer]
Enabled = true
Transport = { BindHost = "127.0.0.1", Port = 33333, Route = "/mcp", RequireAuthToken = true, AuthTokenEnvVar = "MCC_MCP_AUTH_TOKEN" }
Capabilities = { SessionStatus = true, ChatAndCommands = true, Movement = true, Inventory = true, EntityWorld = true }
For a local setup, keeping the bind host on
127.0.0.1is the safest default.We recommend enabling bearer-token protection and exporting the token before starting MCC:
export MCC_MCP_AUTH_TOKEN="replace-me"All settings
EnabledDescription:
Enables or disables the built-in MCP server bot.
Type:
booleanDefault:
false
Transport.BindHostDescription:
Hostname or IP address the embedded HTTP server binds to.
Use
127.0.0.1for local-only access. Binding to0.0.0.0exposes the endpoint to your network.Type:
stringDefault:
127.0.0.1
Transport.PortDescription:
TCP port used by the embedded HTTP MCP server.
Type:
integerDefault:
33333
Transport.RouteDescription:
HTTP path used by the MCP endpoint.
Type:
stringDefault:
/mcp
Transport.RequireAuthTokenDescription:
Require an
Authorization: Bearer ...header before clients can use the server.Recommended:
trueType:
booleanDefault:
false
Transport.AuthTokenEnvVarDescription:
Environment variable name MCC reads when bearer-token auth is enabled.
Type:
stringDefault:
MCC_MCP_AUTH_TOKEN
Capabilities.SessionStatusDescription:
Enables session, server, chat-history, event-history, reference, and status-reporting tools.
Type:
booleanDefault:
true
Capabilities.ChatAndCommandsDescription:
Enables chat sending, internal command execution, respawn, disconnect, quit, and related direct-control tools.
Type:
booleanDefault:
true
Capabilities.MovementDescription:
Enables movement, path preview, look, reachability, and nearby block/player queries.
Type:
booleanDefault:
true
Capabilities.InventoryDescription:
Enables inventory snapshots, container open/close, window actions, item selection, item use, drop, deposit, and withdraw tools.
Type:
booleanDefault:
true
Capabilities.EntityWorldDescription:
Enables entity queries, sign search, block lookup, nearby dropped-item listing, and item pickup helpers.
Type:
booleanDefault:
true
The client examples below assume the default local endpoint
http://127.0.0.1:33333/mcp.The recommended setup is to keep
RequireAuthToken = true. If you temporarily disable auth for local testing, you can omit the auth-header parts.Claude Code
Official docs: Claude Code MCP
These commands assume the default local MCC endpoint:
claude mcp add --transport http mcc http://127.0.0.1:33333/mcp
claude mcp list
If you enabled bearer-token auth in MCC:
claude mcp add --transport http mcc http://127.0.0.1:33333/mcp \
  --header "Authorization: Bearer $MCC_MCP_AUTH_TOKEN"
You can check the server status inside Claude Code with
/mcp.Codex
Official docs: OpenAI Docs MCP quickstart
Add the MCC server with the Codex CLI:
codex mcp add mcc --url http://127.0.0.1:33333/mcp
codex mcp list
You can also place it directly in
~/.codex/config.toml:[mcp_servers.mcc] url = "http://127.0.0.1:33333/mcp"If your Codex setup supports custom MCP headers, add the same
Authorization: Bearer ...header you use in the other examples.Cursor
Official docs: Cursor MCP docs
Create
~/.cursor/mcp.jsonand add:{ "mcpServers": { "mcc": { "url": "http://127.0.0.1:33333/mcp" } } }Restart Cursor after saving the file.
If your Cursor setup uses auth headers for remote MCP servers, add
Authorization: Bearer ...with your MCC token.OpenCode
Official docs: OpenCode MCP servers
Put this in
~/.config/opencode/opencode.jsonfor a global setup, or inopencode.jsonin your project root:{ "$schema": "https://opencode.ai/config.json", "mcp": { "mcc": { "type": "remote", "url": "http://127.0.0.1:33333/mcp", "enabled": true } } }If you enabled bearer-token auth in MCC, add headers like this:
{
  "$schema": "https://opencode.ai/config.json",
  "mcp": {
    "mcc": {
      "type": "remote",
      "url": "http://127.0.0.1:33333/mcp",
      "enabled": true,
      "oauth": false,
      "headers": {
        "Authorization": "Bearer {env:MCC_MCP_AUTH_TOKEN}"
      }
    }
  }
}
Available MCP tools
These are the tools currently exposed by
ChatBot.McpServer.Session, status, and reference
mcc_session_status: Get the current MCC session state and feature availability.mcc_server_info: Get the active server connection info and current TPS.mcc_player_state: Get the current controlled-player state.mcc_world_state: Get world state, chunk loading progress, and last observed time and weather values.mcc_chunk_status: Check chunk loading status for the player location or a target coordinate.mcc_player_stats: Get player stats, orientation, and current location.mcc_status_effects: List active player status effects.mcc_loaded_bots: List loaded built-in bots and scripts.mcc_internal_commands_list: List available MCC internal commands.mcc_agent_guidance: Return the MCC MCP operator prompt bundle for external agents.mcc_materials_list: List known MCC material names.mcc_block_types_list: List known MCC block types.mcc_entity_types_list: List known MCC entity types.mcc_world_block_at: Get block information at a world coordinate.
Observed state
mcc_recent_events: Read recent high-signal runtime events such as weather, titles, death, respawn, inventory open/close, and joins/leaves.mcc_chat_history: Read recent chat and system lines seen by MCC.mcc_players_list: List online players known to MCC.mcc_players_detailed: List tracked players with UUID, latency, gamemode, and coordinates when available.
Chat and direct control
mcc_send_chat: Send chat text or a slash command to the server.mcc_quit_client: Quit MCC cleanly.mcc_disconnect: Disconnect MCC from the server without quitting the process.mcc_respawn: Respawn the controlled player when dead.mcc_run_internal_command: Run an MCC internal command.mcc_animation: Play a hand-swing animation.mcc_toggle_sneak: Start or stop sneaking.mcc_toggle_sprint: Start or stop sprinting.mcc_change_hotbar_slot: Change the active hotbar slot.mcc_select_item: Select a hotbar item by item type.mcc_use_item_on_hand: Use the currently held item.mcc_use_item_on_block: Use the held item on a target block.mcc_dig_block: Dig a block at a target location.mcc_place_block: Place the currently held block or item at a target location.
Movement, view, and nearby queries
mcc_raycast_block: Raycast from the player's view and return the first non-air block hit.mcc_path_preview: Compute a path without moving there.mcc_block_scan: Scan nearby blocks around the player.mcc_blocks_find: Find nearby blocks by name, type, or ID.mcc_player_nearby: Check whether a player is nearby.mcc_player_locate: Locate a tracked player by name.mcc_entity_nearest: Find the nearest tracked entity that matches the requested filters.mcc_can_reach_position: Check whether MCC can path to a coordinate without moving there.mcc_move_to: Path to a world coordinate and verify arrival.mcc_move_to_player: Locate a tracked player, move to them, and verify arrival.mcc_look_at: Rotate the view toward a world coordinate.mcc_look_direction: Rotate the view to a cardinal direction or straight up/down.mcc_look_angles: Rotate the view to explicit yaw and pitch angles.
Inventory and container workflows
mcc_inventory_snapshot: Read a snapshot of one inventory.mcc_inventory_search: Search the player inventory and optionally open containers for matching items.mcc_inventories_list: List open inventories and containers known to MCC.mcc_container_open_at: Open a container block at world coordinates and wait for its inventory.mcc_container_close: Close an open non-player container.mcc_inventory_window_action: Perform a window action on an inventory slot.mcc_inventory_drop_item: Drop an exact item count from an inventory.mcc_container_deposit_item: Move items from the player inventory into an open container.mcc_container_withdraw_item: Move items from an open container into the player inventory.
Entities, signs, and dropped items
mcc_entities_query: Query tracked entities.mcc_entities_list: List tracked entities with optional filters.mcc_entity_info: Get detailed info for one tracked entity.mcc_entity_interact: Interact with a tracked entity.mcc_entity_attack: Attack a tracked entity.mcc_signs_find: Find nearby signs by text.mcc_items_list: List nearby dropped item entities.mcc_items_pickup: Move to and pick up nearby dropped items of a given type.
Simple example usage
Once your client is connected, keep the prompts simple and concrete.
What server is MCC connected to right now?List online players and tell me whether Steve is nearby.Preview a path to 10 80 0. If the path looks valid, move there.Show my player inventory, then open the chest at 2 80 0 and tell me what is inside.List nearby dropped Stone items and pick them up.Find the nearest ArmorStand and show me its details.
Map
Description:
This Chat Bot allows you to render items maps in the console, to
.bmpimages and to relay them to Discord using the Discord Bridge Chat Bot.This is useful for solving captchas on servers which require it, or saving the map art into an image.
The maps are rendered into
Rendered_Mapsfolder which will be auto created in the same folder where the client executable is located.Commands:
When enabled will add the
/mapscommand.Usage:
/maps <list/render <id>> | maps <l/r <id>>Settings:
Section:
ChatBot.MapAll settings
EnabledDescription:
This setting specifies if the Map Chat Bot is enabled.
Available values:
trueandfalse.Type:
booleanDefault:
false
Render_In_ConsoleDescription:
This setting specifies if the Map Chat Bot should render the map in the console.
It is recommended to use something like Power Shell for the best map quality (at least for Windows users).
Available values:
trueandfalse.Type:
booleanDefault:
true
Save_To_FileWarning
If you want the Discord relay feature, you must enable this setting!
Description:
This setting specifies if the Map Chat Bot should render the map and save it into a file (
.bmpformat)Available values:
trueandfalse.Type:
booleanDefault:
false
Auto_Render_On_UpdateWarning
On some versions older than 1.17 this could cause some performance issue on older hardware if there a lot of maps being rendered, since map updates are sent multiple times a second. Be careful.
Description:
This setting specifies if the Map Chat Bot should automatically render maps as they're received from the servers.
Available values:
trueandfalse.Type:
booleanDefault:
false
Delete_All_On_UnloadDescription:
This setting specifies if the Map Chat Bot should automatically delete rendered maps when un-loaded or reloaded.
Available values:
trueandfalse.Type:
booleanDefault:
true
Notify_On_First_UpdateDescription:
This setting specifies if the Map Chat Bot should notify you when it got a map from the server for the first time.
Available values:
trueandfalse.Type:
booleanDefault:
false
Resize_Rendered_ImageNote
The bigger the size, the less is the quality.
Tip
For upscaling your maps you could use (getting a bit better quality): https://deepai.org/machine-learning-model/torch-srgan
Description:
This setting specifies if the Map Chat Bot should resize the rendered image (the one that is saved to a file).
This is useful if you're relying map images to Discord via the Discord Bridge Chat Bot.
The default map size is
128x128.Available values:
trueandfalse.Type:
booleanDefault:
false
Resize_ToNote
Might be a bit slow on less powerful systems when rendering a lot of maps. Lower down the resolution if you have any performance issues. If your system is not that powerful and can't handle it, use external tools for upscaling and resizing.
Description:
Which size the map should be resized to if
Rasize_Rendered_Imageistrue.Type:
integerDefault:
512
Send_Rendered_To_DiscordWarning
The Discord Bridge Chat Bot must be enabled and configured!
Warning
You need to enable
Save_To_Filein order for this to work.Note
Sometimes when the client connects, the Discord Bridge will be loaded a tiny bit after. Rendered map images are queued up and sent in order as soon as the Discord Bridge is ready and connected.
Description:
Send a rendered map (saved to a file) to a Discord channel via the Discord Bridge Chat Bot.
Type:
booleanDefault:
false
PlayerList Logger
Description:
Log the list of players periodically into a textual file.
Settings:
Section:
ChatBot.PlayerListLoggerAll settings
EnabledDescription:
This setting specifies if the PlayerList Logger Chat Bot is enabled.
Available values:
trueandfalse.Default:
false
FileDescription:
This setting specifies the name of the player list Log file that will be created.
Default:
playerlog.txt
DelayDescription:
Save the list of players every how many seconds.
Type:
floatDefault:
60.0
Remote Control
Description:
Send MCC console commands to your bot through server PMs (
/tell).You need to have ChatFormat working correctly and add yourself in botowners to use the bot.
Warning
Server admins can spoof PMs (
/tellraw,/nick) so enableRemoteControlonly if you trust server admins.Settings:
Section:
ChatBot.RemoteControlAll settings
EnabledDescription:
This setting specifies if the Remote Control Chat Bot is enabled.
Available values:
trueandfalse.Type:
booleanDefault:
false
AutoTpacceptDescription:
This setting specifies if the Remote Control Chat Bot should automatically accept teleport requests.
Available values:
trueandfalse.Type:
booleanDefault:
true
AutoTpaccept_EveryoneDescription:
This setting specifies if the Remote Control Chat Bot should automatically accept teleport requests from everyone.
Available values:
trueandfalse.Type:
booleanDefault:
false
Replay Capture
Description:
Enable automatic recording of the game and replay it later using the Replay Mod (https://www.replaymod.com/).
Use
/replay saveto create a snapshot replay file while recording, and/replay stopto finalize the active recording.Warning
Use
/replay stopor exit MCC gracefully with/quitso the replay file can be finalized cleanly.Note
Please note that due to technical limitations, the client player (you) will not be shown in the replay file
Note
Each MCC instance uses its own temporary replay cache, so multiple MCC clients can record from the same folder without overwriting each other.
Settings:
Section:
ChatBot.ReplayCaptureAll settings
EnabledDescription:
This setting specifies if the Replay Mod Chat Bot is enabled.
Available values:
trueandfalse.Type:
booleanDefault:
false
Backup_IntervalDescription:
This setting specifies the time interval in seconds when the replay file should be auto-saved.
Use
-1to disable.Type:
floatDefault:
300.0
Script Scheduler
Description:
Schedule commands and scripts to launch on various events such as server join, date/time or time interval.
Settings:
Section:
ChatBot.ScriptSchedulerAll settings
EnabledDescription:
This setting specifies if the Script Scheduler Chat Bot is enabled.
Available values:
trueandfalse.Type:
booleanDefault:
false
Defining a task
Tip
It is recommended that you align subsections to the right by one tab or 4 spaces for better readability.
Description:
Each task is defined as a new subsection
[[ChatBot.ScriptScheduler.TaskList]]of the section:[ChatBot.ScriptScheduler].Subsection format:
[[ChatBot.ScriptScheduler.TaskList]]
<setting> = <value>
<setting> = <value>
Available settings/options:
Trigger_On_First_LoginWill trigger the task when you login the first time.
Available values:
trueandfalseType:
booleanTrigger_On_LoginWill trigger the task each time you login.
Available values:
trueandfalseType:
booleanTrigger_On_TimesThis will enable the task to trigger at exact time(s) you want.
The type of this setting is
inline table, that has the following sub-settings/options:Enable- Enables/Disables the setting (Boolean, so eithertrueorfalse)Times- An array/list of times on which the task should run/trigger (each element is of the Local Time type, eg.14:00:00, so:hours:minutes:seconds)
Example:
Trigger_On_Times = { Enable = true, Times = [ 14:00:00, 22:35:8] }Trigger_On_IntervalThis will enable the task to trigger at certain interval which you've defined.
The type of this setting is
inline table, that has the following sub-settings/options:Enable- Enables/Disables the setting (Boolean, so eithertrueorfalse)MinTime- Time in seconds (the type isdouble, eg.3.14)MaxTime- Time in seconds (the type isdouble, eg.3.14)
If
MinTimeandMaxTimeare the same, the interval will be consistent, however if they are not, the ChatBot will generate a random interval in between those two numbers provided, each time the task is run.Example:
Trigger_On_Interval = { Enable = true, MinTime = 30.0, MaxTime = 160.0 }
Full example
[ChatBot.ScriptScheduler]
Enabled = true

    [[ChatBot.ScriptScheduler.TaskList]]
    Task_Name = "Task Name 1"
    Trigger_On_First_Login = false
    Trigger_On_Login = false
    Trigger_On_Times = { Enable = true, Times = [ 14:00:00, ] }
    Trigger_On_Interval = { Enable = true, MinTime = 3.6, MaxTime = 4.8 }
    Action = "send /hello"

    [[ChatBot.ScriptScheduler.TaskList]]
    Task_Name = "Task Name 2"
    Trigger_On_First_Login = false
    Trigger_On_Login = true
    Trigger_On_Times = { Enable = false, Times = [ ] }
    Trigger_On_Interval = { Enable = false, MinTime = 1.0, MaxTime = 10.0 }
    Action = "send /login pass"
Telegram Bridge
Description:
This bot allows you to send and receive messages and commands via a Telegram Bot DM or to receive messages in a Telegram channel.
Warning
You can't send messages and commands from a group channel, you can only send them in the bot DM, but you can get the messages from the client in a group channel.
Setup:
- First you need to create a Telegram bot and obtain an API key, to do so, go to Telegram and find @botfather
- Click on
Startbutton and read the bot reply, then type/newbot, the Botfather will guide you through the bot creation. - Once you create the bot, copy the API key that you have gotten, and put it into the
Tokenfield ofChatBot.TelegramBridgesection (this section). - Then launch the client and go to Telegram, find your newly created bot by searching for it with its username, and open a DM with it.
- Click on
Startbutton and type and send the following command.chatidto obtain the chat id. - Copy the chat id number (eg.
2627844670) and paste it in theChannelIdfield and add it to theAuthorized_Chat_Idsfield (in this section) (an id in "Authorized_Chat_Ids" field is a number/long, not a string!), then save the file. Now you can use the bot using it's DM.
Danger
Do not share your API key with anyone else as it will give them the control over your bot. Save it securely.
Danger
If you do not add the id of your chat DM with the bot to the "Authorized_Chat_Ids" field, ayone who finds your bot via search will be able to execute commands and send messages!
Danger
An id pasted in to the "Authorized_Chat_Ids" should be a number/long, not a string!
Settings:
Section:
ChatBot.TelegramBridgeAll settings
EnabledDescription:
This setting specifies if the Telegram Bridge Chat Bot is enabled.
Available values:
trueandfalse.Type:
booleanDefault:
false
TokenDescription:
Your Telegram Bot token.
Type:
stringDefault: empty
ChannelIdDescription:
An ID of a channel where you want to interact with the MCC using the bot.
Type:
stringDefault: empty
Authorized_Chat_IdsDescription:
A list of Chat IDs that are allowed to send messages and execute commands. To get an id of your chat DM with the bot use
.chatidbot command in Telegram.Type:
array of stringsDefault: empty
Message_Send_TimeoutDescription:
How long to wait (in seconds) if a message can not be sent to Telegram before canceling the task (minimum 1 second).
Type:
integerDefault: 3
Message Formats
Words wrapped with
{and}are going to be replaced during the code execution, do not change them! For example,{message}is going to be replace with an actual message,{username}will be replaced with an username,{timestamp}with the current time. For Telegram message formatting, check the following.PrivateMessageFormatDescription:
A format that is used to display a private chat message on the minecraft server, in a Telegram channel.
Type:
stringDefault:
*(Private Message)* {username}: {message}
PublicMessageFormatDescription:
A format that is used to display a public chat message on the minecraft server, in a Telegram channel.
Type:
stringDefault:
{username}: {message}
TeleportRequestMessageFormatDescription:
A format that is used to display a teleport request on the minecraft server, in a Telegram channel.
Type:
stringDefault:
A new Teleport Request from **{username}**!
Items Collector
Description:
Collect items on the ground using this Chat Bot.
Settings:
Section:
ChatBot.ItemsCollectorAll settings
EnabledDescription:
This setting specifies if the Items Collector chat bot is enabled.
Available values:
trueandfalse.Type:
booleanDefault:
false
Collect_All_Item_TypesDescription:
Specifies if the bot will collect all items, regardless of their type. If you want to use the whitelisted item types, disable this by setting it to
false.Available values:
trueandfalse.Type:
booleanDefault:
false
Items_WhitelistDescription:
In this list you can specify which items the bot will collect. To enable this, set the
Collect_All_Item_Typesto false.
Note
This does not prevent the bot from accidentally picking up other items, it only goes to positions where it finds the whitelisted items
Available values: Item Type List
Type:
array of strings with item namesDefault:
[ "Diamond", "NetheriteIngot" ]
Delay_Between_TasksDescription:
Delay in milliseconds between bot scanning items (Recommended: 300-500)
Type:
integerDefault:
300
Collection_RadiusDescription:
The radius of blocks in which bot will look for items to collect.
Type:
doubleDefault:
30.0
Always_Return_To_StartDescription:
Specifies if the bot will return to it's starting position after there are no items to collect.
Available values:
trueandfalse.Type:
booleanDefault:
true
Prioritize_ClustersDescription:
Specifies if the bot will go after clustered items instead for the closest ones.
Available values:
trueandfalse.Type:
booleanDefault:
true