Installation
- Quick Install (one-liner)
- YouTube Tutorials
- Download a compiled binary
- Building from the source code
- Run using Docker
- Run on Android
- Run MCC 24/7 on a VPS
Quick Install
The quickest way to get MCC is to run the installer script for your platform. It auto-detects your OS and CPU architecture, fetches the latest release from GitHub, and saves the binary to your current directory.
Linux / macOS
Open a terminal in the folder where you want MCC and run:
curl -fsSL https://mccteam.github.io/install.sh | shIf you prefer wget:
wget -qO- https://mccteam.github.io/install.sh | shThe script downloads MinecraftClient and marks it executable. Supported architectures: x64, arm64, arm (Linux only).
Windows
Open PowerShell in the folder where you want MCC and run:
iwr -useb https://mccteam.github.io/install.ps1 | iexThe script downloads MinecraftClient.exe. Supported architectures: x64, x86, arm64.
Tip
You can also download the scripts directly and inspect them before running:
- Linux/macOS: install.sh
- Windows: install.ps1
YouTube Tutorials
If you're not the kind of person that likes textual tutorials, our community has made video tutorials available on YouTube.
Download a compiled binary
You can download a compiled binary of the latest build from the GitHub Releases page.
Building from the source code
We recommend you to download our precompiled binary file from GitHub.
However, if you want to build the program from source code, please follow the guide.
Windows
Windows build instructions
Requirements:
- Git
- .NET 10 SDK or Visual Studio configured for C# app development
Note
If you want to modify the code and you are new to C# or programming in general, the tutorials listed in Creating Bots are a good starting point.
Cloning using Git
Install Git
- Make a new folder where you want to keep the source code
- Then open it up, hold
SHIFTand do aright-clickon the empty white space in the folder - Click on
Git Bash Herein the context menu - Clone the GitHub repository by running:
git clone https://github.com/MCCTeam/Minecraft-Console-Client.git --recursiveIf you cloned the repository without --recursive, run:
git submodule update --init --recursive- Once the repository has been cloned, you can close the
Git Bashterminal emulator - Open up the new cloned folder
Download translation resources (optional)
- Visit MCC project's homepage on Crowdin.
- You will need to log in to your Crowdin account in order to download.
- Click on the language you want to download the translation for.
- Find
MinecraftClient->Resources->Translations->MCC in-app text - Click the button
•••at the end of the line. - Click Download and save the file to folder
/MinecraftClient/Resources/Translations/. - Find
MinecraftClient->Resources->ConfigComments->Comments in the settings file - Click the button
•••at the end of the line. - Click Download and save the file to folder
/MinecraftClient/Resources/ConfigComments/. - Find
MinecraftClient->Resources->AsciiArt->ASCII Arts (Please use fixed-width fonts for editing) - Click the button
•••at the end of the line. - Click Download and save the file to folder
/MinecraftClient/Resources/AsciiArt/. - If you need to download a translation in another language, go to step 3 to continue.
Building using the Visual Studio
- Open up the
MinecraftClient.slnvia Visual Studio - Right click on
MinecraftClientsolution in theSolution Explorer - Click on
Properties - Open up the
Buildtab and select configurationRelease - Press
CTRL + Sand close the file - Right click on
MinecraftClientsolution in theSolution Explorer - Click
Build
If the build succeeds, the published binary MinecraftClient.exe will be in MinecraftClient/bin/Release/net10.0/win-x64/publish/.
Building using .NET manually without Visual Studio
Tip
If you are following the AI-assisted repo workflow, use WSL or another Unix-style shell and prefer source tools/mcc-env.sh followed by mcc-build. That path keeps MCC's session and temp-build helpers enabled. The dotnet commands below are the low-level manual fallback.
- Open the
Minecraft-Console-Clientfolder you've cloned or downloaded - Open the PowerShell (
Right-Clickon the whitespace and clickOpen PowerShell, or in Windows Explorer:File -> Open PowerShell) - Install the .NET 10 SDK if you do not already have it. The easiest current option on Windows is:
winget install Microsoft.DotNet.SDK.10- Run the following command for a normal local build:
dotnet build MinecraftClient.sln -c Release- If you want a release-like published binary that matches the repo's CI workflow, run:
source tools/mcc-env.sh
mcc-publish --rid win-x64- Verify the SDK installation if needed:
dotnet --infoIf the publish step succeeds, the published binary MinecraftClient.exe will be in MinecraftClient/bin/Release/net10.0/win-x64/publish/.
Linux, macOS
Linux and macOS build instructions
Note
If you're using Linux we will assume that you should be able to install git on your own. If you don't know how, search it up for your distribution, it should be easy. (Debian based distros: apt install git, Arch based: pacman -S git)
Requirements:
Git
Linux:
.NET 10 SDK
Cloning using Git
- Open up a terminal emulator and navigate to the folder where you will store the MCC
- Recursively clone the GitHub repository by running:
git clone https://github.com/MCCTeam/Minecraft-Console-Client.git --recursiveGo to the folder you've cloned (should be
Minecraft-Console-Client)Install the .NET 10 SDK.
On Ubuntu 24.04 LTS, use the built-in Ubuntu package feeds:
sudo apt-get update && \
  sudo apt-get install -y dotnet-sdk-10.0
On macOS, the normal path is to use the official installer from the .NET download page. Pick
Arm64for Apple Silicon andx64for Intel Macs.
If you want to download translation resources, please check out Download translation resources
For the repo's normal local development workflow, source the helper environment and build through
mcc-build:source tools/mcc-env.sh mcc-buildIf you specifically want the low-level manual .NET command instead of the MCC wrapper, run:
dotnet build MinecraftClient.sln -c ReleaseRun the following command if you want a release-like published binary that matches the repo's CI workflow:
On Linux:
source tools/mcc-env.sh
mcc-publish --rid linux-x64
Note
If you are using Linux on ARM, 32-bit, RHEL-based distributions, or Musl, pick the appropriate RID for your platform and replace
-r linux-x64with it, for example-r linux-arm64.On macOS:
source tools/mcc-env.sh
mcc-publish --rid osx-x64
Note
If you are not using an Intel Mac, pick the appropriate RID for your processor and replace
-r osx-x64with it, for example-r osx-arm64.
If the build has succeeded, the compiled binary MinecraftClient will be in:
- Linux:
MinecraftClient/bin/Release/net10.0/linux-x64/publish/ - macOS:
MinecraftClient/bin/Release/net10.0/osx-x64/publish/
You can verify the SDK installation with:
dotnet --infoUsing Docker
Docker setup and usage
Requirements:
- Git
- Docker
Note
This section is for more advanced users, if you do not know how to install git or docker, you can take a look at other sections for Git, and search on how to install Docker on your system.
Warning
Docker works, but you need to start the container in interactive mode. Starting it in headless mode can still crash MCC.
- Clone the GitHub repository by running:
git clone https://github.com/MCCTeam/Minecraft-Console-Client.git --recursive- Navigate to
Minecraft-Console-Client/Docker - Build the image using the following command
docker build -t minecraft-console-client:latest .Start the container using Docker:
Danger
Because of a ConsoleInteractive issue, starting the container in headless mode can crash MCC. Start it with the interactive command below, then detach with CTRL + P followed by CTRL + Q if you want to leave it running in the background.
# You can omit -v if you do not want a mounted volume. Keeping the volume makes it much easier to edit the TOML config stored in MinecraftClient.ini from the host.
docker run -it -v <PATH_ON_YOUR_MACHINE_TO_MOUNT>:/opt/data minecraft-console-client:latest
Now you could login and the Client is running.
To detach from the Client but still keep it running in the Background press: CTRL + P and then after CTRL + Q.
To reattach use the docker attach command.
Start the container using docker-compose:
By default, the volume of the container gets mapped into a new folder named data in the same folder the docker-compose.yml is stored.
If you don't want to map a volume, you have to comment out or delete the entire volumes section:
#volumes:
#- './data:/opt/data'
Make sure you are in the directory the docker-compose.yml is stored before you attempt to start. If you do so, you can start the container:
docker-compose run MCCRemember to remove the container after usage:
docker-compose downIf you use MinecraftClient.ini and entered your data there, you can start your container using
docker-compose up
docker-compose up -d # for daemonized background running
Note that you won't be able to interact with the client using docker-compose up. If you want that functionality, please use the first method: docker-compose run MCC.
As above, you can stop and remove the container using
docker-compose downRun on Android
It is possible to run Minecraft Console Client on Android through Termux and Ubuntu, but it requires a manual setup, so be careful not to skip any steps. Depending on your technical background, internet speed, and device speed, this can take anywhere from 10 to 20 minutes or more.
Note
This section gets a bit technical. If you run into issues, open a discussion on our GitHub repository page, or ask us on our Discord server.
Note
You're required to have some bare basic knowledge of Linux, if you do not know anything about it, watch this video to get familiar with basic commands.
Note
Here we're installing everything on the root account for simplicity sake, if you want to make a user account, make sure you update the command which reference the /root directory with your home directory.
Installation
Android installation steps (Termux + Ubuntu + .NET + MCC)
Termux
Warning
The Play Store version of Termux is outdated and not supported. Install Termux from F-Droid (recommended) or from the GitHub releases page.
F-Droid (recommended): Install the F-Droid app store, search for "Termux", and install it.
GitHub releases: Go to the latest Termux GitHub release, download the APK file whose name contains universal (e.g. termux-app_v...-debug_universal.apk), and install it.
Note
If your file manager does not let you install APK files, install and use File Manager + and grant it permission to install third-party applications when asked.
Warning
Once you have installed Termux, open it, pull down the Android notification drawer, find the Termux notification, and expand it (swipe down on the notification) until you see Exit | Acquire wakelock. Tap Acquire wakelock and allow Termux to bypass battery optimization when prompted. Skipping this step may cause Termux to be killed by Android when running in the background.
Installing Ubuntu
We use proot-distro, an official Termux utility, to install Ubuntu. It will install the latest Ubuntu LTS release available for your device architecture.
Open Termux and run the following commands one at a time, in order:
pkg update -ypkg upgrade -ypkg install proot-distro -y
Note
If you are asked to press Y/N during the update or upgrade step, enter Y and press Enter.
Now install Ubuntu:
pd install ubuntu:26.04Once the installation finishes, start Ubuntu with:
pd login ubuntuNote
Every time you open Termux after it has been closed, run this command to get back into Ubuntu.
Installing .NET
First, update the Ubuntu package lists and install a few dependencies and tools:
apt update && apt upgrade -y && apt install -y dotnet-sdk-10.0 wget curl nanoInstalling MCC
Now we can install MCC.
Let's make a folder where MCC will be stored:
mkdir MinecraftConsoleClient
cd MinecraftConsoleClient
Download the latest MCC binary for ARM (the script auto detects the platform):
wget -qO- https://mccteam.github.io/install.sh | shNow you can run the MCC with this command:
./MinecraftClientRunning MCC
When you open Termux next time, start Ubuntu with:
pd login ubuntuThen enter the folder you made cd MinecraftConsoleClient (If you named it different, use that name).
Then run MCC with: ./MinecraftClient
To stop MCC from running you can press: CTRL + C
To edit the configuration/settings, you need a text editor, we recommend Nano, as it's very simple to use.
Note
If you do not know how to use Nano, watch this YouTube tutorial.
For downloading files, you can use the wget file we have installed, simply run:
wget your_link_here (you have examples above, and a video tutorial down bellow).
Also, here are some linux tutorials for people who are new to it:
Run on a VPS
Note
This is a newer section. If you spot a mistake, please report it by opening an issue in our GitHub repository.
The Minecraft Console Client can be run on a VPS 24 hours, 7 days a week.
- What is a VPS?
- Prerequisites
- Where to get a VPS
- Initial Amazon VPS setup
- Initial VPS setup
- Creating a new user account
- Installing .NET Core 6
- Installing the Minecraft Console Client
What is a VPS?
VPS stands for a Virtual Private Server, it's basically a remote virtual PC that is running in the cloud, 24 hours a day, 7 days in week. To be precise, it's a virtual machine that runs on top of a host operating system (eg. Proxmox).
You can use a VPS for hosting a website, or a an app, or a game server, or your own VPN, or the Minecraft Console Client.
Here is a YouTube video that explains it in more detail if you are interested.
Prerequisites
Git Bash (if you are on Windows)
Download and install Git Bash.
Note
Make sure to allow the installation to add it to the context menu
sshandssh-keygencommands (on Windows they are available with Git Bash; on macOS and Linux they should be available by default. If not, install them first.)Basic knowledge of Linux shell commands, terminal emulator usage, SSH and Nano editor.
If you already know this, feel free to skip.
if you get stuck, watch those tutorials.
If you're new to this, you can learn about it here:
Where to get a VPS
VPS providers and pricing
You have 2 options:
Buying a VPS
If you do not want to give your info to Amazon or don't have a debit card, you can buy your own VPS.
What hardware requirements I need for running the MCC?
The MCC is not expensive to run, so it can run on basically any hardware, you do not need to spend a lot of money on a VPS if you are going to run just the MCC, go with the cheapest option.
Where to buy a VPS?
Danger
In this tutorial we will be using Ubuntu 24.04 LTS, so pick that family when choosing your VPS image.
Some of the reliable and cheap hosting providers (sorted for price/performance):
Minimum price:
2.50 EUR / monthNote
If Ubuntu 24.04 LTS is not in the dropdown when ordering, you may need to reinstall later or ask support to do it.
Minimum price:
3.57 EUR / monthMinimum price:
4.51 EUR / monthMinimum price:
4 EUR / monthMinimum price:
7 EUR / monthMore serious VPS able to host multiple applications, 4 CPU cores and 8 GB of RAM, 200 GB SSD
You also may want to search for better deals.
AWS EC2 VPS
Danger
This will require you to have a valid debit card that can be used on internet and a mobile phone number, as well as giving that info to Amazon corporation.
Warning
Scammers often get AWS VPS and use it to mass login on to stolen Microsoft accounts, some AWS IP addresses might be blocked by Microsoft because of that, if so, you might need to switch regions or to use a Proxy. To debug if your IP has been banned by Microsoft, use the ping <ip> and traceroute <ip> commands.
Warning
Related to the warning above, if you have issues logging with Microsoft and you're not banned, you may want to check the Security center on your account and approve the login from the VPS, this can be the case for some users.
Note
If you're not banned, sometimes fetching the keys can take some time, try giving it a minute or two, if it still hangs, hit some keys to refresh the screen, or try restarting and running again. If it still happens, use tmux instead of screen.
Register on AWS and enter all of your billing info and a phone number.
Once you're done, you can continue to Setting up the Amazon VPS.
Initial Amazon VPS setup
AWS EC2 setup steps
Note
Skip this section if you're not using AWS. Go to Initial VPS setup
When you register and open the AWS Console, click on the Search field on the top of the page and search for: EC2
Note
Make sure to select the region closest to you for the minimal latency
Click on the Launch instance button.
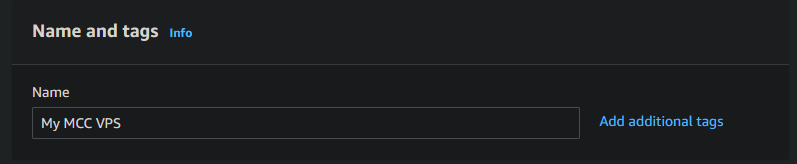
Fill out the Name field with a name of your preference.
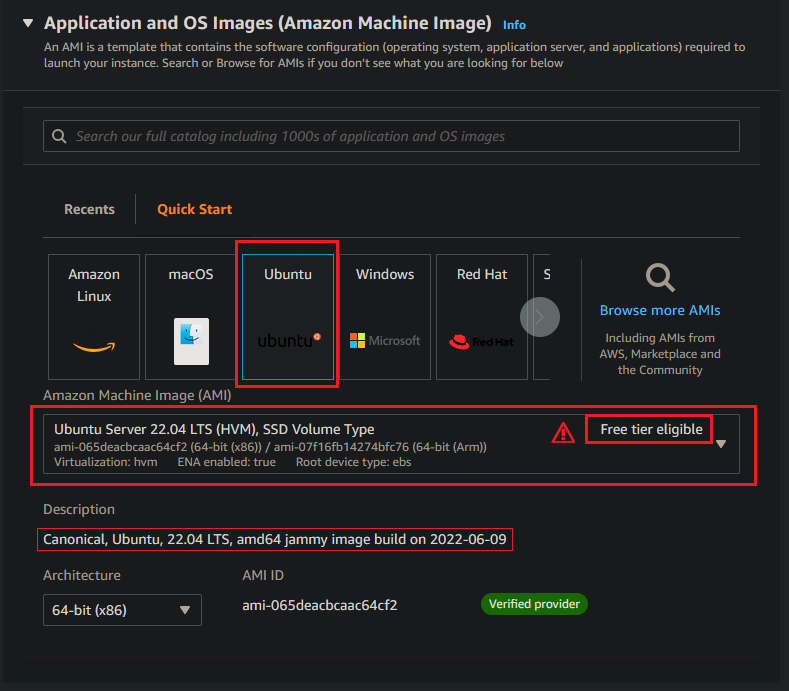
For the Application and OS images select the current Ubuntu Server 24.04 LTS image. The exact AWS label may vary slightly by point release.
Danger
Make sure that it has Free tier eligible next to it.
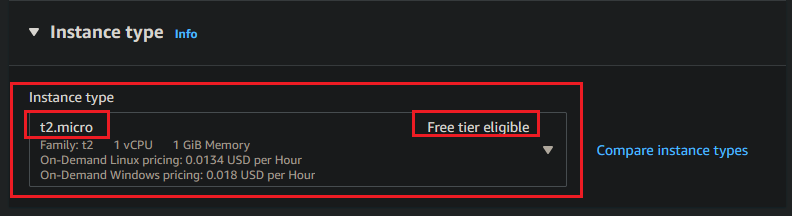
For the Instance type select t2.micro.
For the Key pair (login) click on Create new key pair and name it VpsRoot, leave the rest of settings as default and click Create key pair, this will generate a RSA private key that will be automatically downloaded.
Danger
Make sure that you save this file in a safe place and do not loose it, it's of an upmost importance since it's used to access the root/admin account of the VPS. Without it you will not be able to access the root account of the VPS! Also do not let it fall into wrong hands.
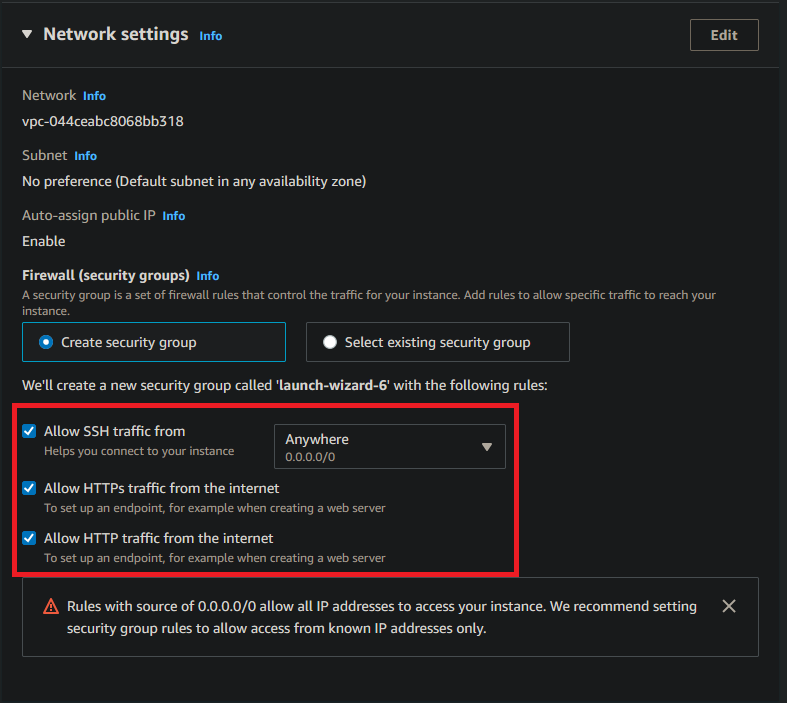
For the Network settings check the following checkboxes on:
Allow SSH traffic from(Anywhere)Allow HTTPs traffic from the internetAllow HTTP traffic from the internet
Note
The SSH traffic from Anywhere is not the best thing for security, you might want to enter IP addresses of your devices from which you want to access the VPS manually.
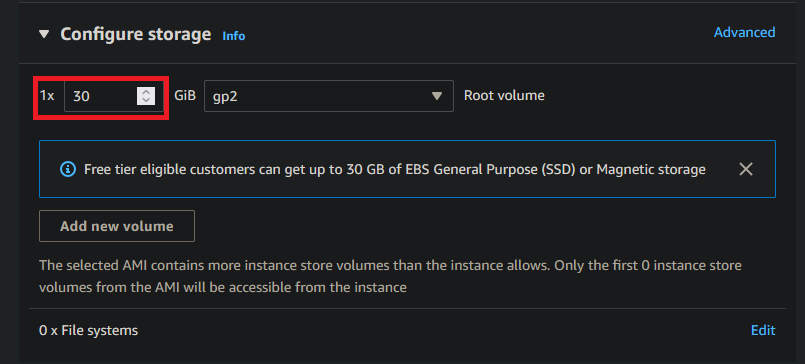
For the Storage enter 30.
Finally, review the Summary confirm that everything is as in the tutorial and that you will not be charged and click on the Launch instance. Once you've clicked on the button, it will take a couple of minutes for the instance to be available up and running.
Once the instance is up and running, go to it's details and copy the Public DNS v4 IP.
You now need to login, go to your folder where you keep the private key you've generated and downloaded (make sure you make a new folder for it, do not keep in the downloads folder) and right click on the empty white space (not on files), if you're on Windows click Git Bash here, on mac OS and Linux click on Open Terminal (or whatever it is called).
In order to login with SSH, you are going to use the following command:
ssh -i <name of your private root key here> ubuntu@<your public dns v4 ip here>Note
< and > are not typed, that is just a notation for a placeholder!
Note
ubuntu is a default root account username for Ubuntu on AWS!
Example:
ssh -i VpsRoot.pem ubuntu@ec2-3-71-108-69.eu-central-1.compute.amazonaws.comIf you've provided the right info you should get Welcome to Ubuntu 20.04.5 LTS message.
Now you can continue to Creating a new user
Initial VPS setup
Non-AWS VPS login steps
Note
This section if for those who do not use AWS, if you use AWS skip it
When you order the VPS, most likely you will be asked to provide the root account name and password, if it is the case, name the account as root and give it a password of your choice.
Other option is that you will get your login info in the email once the setup is done.
Once you have the root login account info, you need Git Bash on Windows and ssh on macOS or Linux.
If you're on Windows open Git Bash, on mac OS and Linux open a Terminal and type the following command:
ssh <username>@<ip>Note
If you're given a custom port other than 22 by your host, you should add -p <port here> before the username (eg. ssh -p <port here> <username>@<ip>) or :<port> after the ip (eg. ssh <username>@<ip>:<port>)
Example:
ssh root@142.26.73.14Example with port:
ssh -p 2233 root@142.26.73.14Once you've logged in you should see a Linux prompt and a welcome message if there is one set by your provider.
Creating a new user
User account and SSH key setup
Once you've logged in to your VPS you need to create a new user and give it SSH access.
In this tutorial we will be using mcc as a name for the user account that will be running the MCC.
Note
You may be wondering why we're creating a separate user account and making it be accessible over SSH only. This is for security reasons, if you do not want to do this, you're free to skip it, but be careful.
To create a new user named mcc execute the following command:
sudo useradd mcc -mNow we need to give it a password, execute the following command, type the password and confirm it:
sudo passwd mccNote
When you're typing a password it will not be displayed on the screen, but you're typing it for real.
Note
Make sure you have a strong password!
Now we need to give our user account the admin permissions:
sudo usermod -aG sudo mccNow we are going to set it's shell to bash:
sudo chsh mcc -s /bin/bashNow we need to log in as the mcc user:
su mccFill in your password when asked.
Navigate to the mcc user home directory with:
cd ~Make a new .ssh directory:
mkdir .sshEnter it with:
cd .sshMake a new empty file named authorized_keys:
touch authorized_keysDo no close the Git bash/Terminal emulator.
On your PC, make a new folder where you are going to store your SSH keys that you're going to use to log in to the user account.
Open the folder, and right click on the empty white space (not on files), if you're on Windows click Git Bash here, on mac OS and Linux click on Open Terminal (or whatever it is called).
Type the following command:
ssh-keygen -t RSA -b 4096Enter the name of the key file to be: MCC_Key, press Enter.
When asked for a passphrase, enter a password of your choice and confirm it, make sure it's strong and that you remember it, best if you write it down on a piece of paper.
This will generate a private and a public key that you will use to log in to the VPS as a user that you've created.
Now open the MCC_Key.pub file with a text editor of your choice and copy it's contents to the clipboard.
Return to the Git Bash/Terminal emulator and execute the following command:
sudo apt install nano -yThis will install the Nano editor on your VPS.
Now we need to let the SSH service on your VPS know about your newly generated SSH key pair.
Make sure you are in the /home/mcc/.ssh folder, you can confirm this by executing:
pwdIf it does not print /home/mcc/.ssh, navigate to it with:
cd /home/mcc/.sshNow you need to open the authorized_keys file with the nano editor:
nano authorized_keysNow paste the copied contents of the MCC_Key.pub into the nano editor by right clicking on it.
Save the file with CTRL + O, press Enter, and then exit it with CTRL + X.
Now we need to configure the SSHD service to let us login with the SSH key we have generated, for this we need to edit the /etc/ssh/sshd_config file with nano:
sudo nano /etc/ssh/sshd_configFind the #PubkeyAuthentication yes line and remove the # in front to uncomment the line.
Then find the #AuthorizedKeysFile .ssh/authorized_keys .ssh/authorized_keys2 line and remove the # to uncomment the line.
Additionally for better security you can do the following:
- Set
PermitRootLogintoyes - Change the
Portto some number of your choice (22-65000) (Make sure it's at least 2 digits and avoid common ports used by other apps like: 21, 80, 35, 8080, 3000, etc...) - Uncomment
#PasswordAuthentication yesby removing the#in front and set it toyes(This will disable password login, you will be able to login with SSH keys only!)
Save the file with CTRL + O, hit Enter, close it with CTRL + X.
Now we need to restart the SSHD service with:
sudo systemctl restart sshdLet's check if everything is working correctly:
sudo systemctl status sshdIf everything has been configured as it should be you should see active (running) as a status of the service.
If not, open the config file again and check for mistakes.
Press q to exit the log mode.
Logout from the mcc user with exit command, and then logout from the root ubuntu user by typing exit again.
Now we can login to the user with our private MCC_Key file.
Command:
ssh -i <path to the MCC_Key private key> mcc@<ip here>Example:
ssh -i MCC_Key mcc@3.71.108.69Note
If you've changed the Port, make sure you add a -p <your port here> option after the -i <key> option (eg. ssh -i MCC_Key -p 8973 mcc@3.71.108.69)!
If did everything correctly you should see a Linux prompt and a welcome message if there is one on your provider.
You can do whoami to see your username.
Now you can install the .NET 10 SDK and MCC.
Installing .NET 10 SDK
.NET SDK installation on VPS
Note
If your VPS has an ARM CPU, follow this part of the documentation and then return to section after this one.
Log in as the user you've created.
Update the system packages and package manager repositories:
sudo apt update -y && sudo apt upgrade -yOn Ubuntu 24.04 LTS, the official Microsoft docs say .NET is available directly from the Ubuntu package feeds, so you do not need to add the old Microsoft package repository for .NET 10. Install the SDK with:
sudo apt-get update -y && sudo apt-get install -y dotnet-sdk-10.0You can verify the installation with:
dotnet --infoRun the following command to check if everything was installed correctly:
dotnetYou should get:
Usage: dotnet [options]
Usage: dotnet [path-to-application]

Options:
  -h|--help         Display help.
  --info            Display .NET information.
  --list-sdks       Display the installed SDKs.
  --list-runtimes   Display the installed runtimes.

path-to-application:
  The path to an application .dll file to execute.
If you do not get this output and the installation was not successful, try other methods.
If it was successful, you can now install MCC.
Installing MCC on a VPS
MCC installation and screen usage
Now that you have the .NET SDK and a user account, install the screen utility. You will need it if you want MCC to keep running after you close the SSH session.
Note
There is also a Docker method, if you're using Docker, you do not need the screen program.
You can also learn about the screen command from this YouTube tutorial.
To install the screen execute the following command:
sudo apt install screen -yNow you can install the MCC:
- Download a compiled binary
- Building from the source code
- Run using Docker (Doesn't require the
screencommand)
How to use the screen command?
Warning
If you have issues with Screen command, like output not being properly formatted or program handing/freezing, try using tmux, click here to learn how to use it.
To start a screen, type:
screen -S mccNote
mcc here is the name of the screen, you can use whatever you like, but if you've used a different name, make sure you use that one instead of the mcc in the following commands.
Note
You need to make a screen only once, however if you reboot your VPS, you need to start it on each reboot.
Now you will be in the screen, now you can start the MCC and detach from the screen.
To detach from the screen press CTRL + A + D.
To re-attach/return to the screen, execute the following command:
screen -r mccIf you've accidentally closed the SSH session without detaching from the screen it might be still attached, to detach it use:
screen -d mccTo list out screens you can use:
screen -lsTo stop the MCC, you can hit CTRL + D (hit it few times).