Usage
How to run the program:
Using the command line parameters:
Windows
Simply run MinecraftClient.exe
Tip
On Windows it's best using Windows Terminal for the best experience and looks. Some features like emojis in the /chunk command do not work in CMD or Powershell 5
Linux, macOS
To run the client you need to type the following command in your terminal emulator:
./MinecraftClient
If you want to keep it running in the background you can use screen (Linux only)
Example:
# Start the screen
screen -S mcc

# Run it
./MinecraftClient

# Detach from the screen by pressing CTRL + A + D

# Re-attach if you want to have accces again
screen -r mcc
Learn more on how to use the screen command: YouTube
Docker
See Run using Docker
Command-line usage
Minecraft Console Client has a plethora of useful command line parameters, here you can learn about them.
For people not familiar with the command line
For people who are not familiar with the usage of programs in the command line (terminal emulators), here we will explain what every single thing means, if you're already experienced you can skip this.
In command line (terminal emulators) you can run programs by specifying their name and hitting enter, usually programs have additional way of being configured, started or provided some additional data in a different manner, this is achieved by using command line parameters.
Command line parameters are written after the name of the program, they're separated by spaces and they can have a few different formats, examples:
someparameter-some-parameter--some-other-parameter--some-setting="some value"-a=5
Parameters with a single dash (-) are usually used for a single letter (short-hand) parameters, while the ones with a double dash (--) are being used for parameters with a longer/full name.
When you are reading examples, you will often see something like this: <something here>, this means that this is a place holder and it should be changed with some value, excluding the < and the >.
For example <username> you need to change to an username of your liking, example: notch (< and > should not be included).
[ and ] mean that a parameter is an optional one.
They also can hold some values, example from the MCC:
MinecraftClient.exe --debugmessages=false
When a parameter has a textual value that includes one more spaces, you will need to wrap it the value in double quotes ("), example: --some-parameter="some text here with spaces in it"
Here is an example for using a --help command line parameter for MCC that will print out a page on how to use MCC from the command line:
MinecraftClient.exe --help
Quick usage of MCC with examples
Tip
On Linux and macOS, you need to type: ./MinecraftClient instead of MinecraftClient.exe
MinecraftClient.exe --help
MinecraftClient.exe <username> <password> <server>
MinecraftClient.exe --setting=value [--other settings]
MinecraftClient.exe --section.setting=value [--other settings]
MinecraftClient.exe <settings-file.ini> [--other settings]
Examples:
# Logging in as a user: notch, with a password: password123 onto a server with the ip: mc.someserver.com:25565
MinecraftClient.exe notch password123 mc.someserver.com:25565

# Overriding a setting from MinecraftClient.ini using a command line parameter
MinecraftClient.exe --debugmessages=false

# Providing a custom settings ini file and overriding a language to Chinese
MinecraftClient.exe CustomSettingsFile.ini --language=zh
Rules of using the command line parameters
You can mix and match arguments by following theses rules:
- First positional argument may be either the login or a settings file
- Other positional arguments are read in order: login, password, server, command
- Arguments starting with
--can be in any order and position
Examples and further explanations:
MinecraftClient.exe <login> <password> <server>
- This will automatically connect you to the chosen server.
- You may omit password and/or server to specify e.g. only the login
- To specify a server but ask password interactively, use
""as password. - To specify offline mode with no password, use
-as password.
MinecraftClient.exe <login> <password> <server> "/mycommand"
- This will automatically send
/mycommandto the server and close. - To send several commands and/or stay connected, use the 1ScriptScheduler1 bot instead.
MinecraftClient.exe <myconfig.ini>
- This will load the specified configuration file
- If the file contains login / password / server ip, it will automatically connect.
MinecraftClient.exe --setting=value [--other settings]
- Specify settings on the command-line, see possible value in the configuration file
- Use
--section.setting=valuefor settings outside the[Main]section - Example:
--antiafk.enabled=truefor enabling theAntiAFKbot
MinecraftClient.exe <myconfig.ini> <login> <password> <server> [--other settings]
- Load the specified configuration file and override some settings from the file
Internal Commands
These commands can be performed from the chat prompt, scripts or remote control.
From chat prompt, commands must by default be prepended with a slash, eg. /quit.
In scripts and remote control, no slash is needed to perform the command, eg. quit.
Tip
Some commands may not be documented yet or are defined in description of Chat Bots, use /help to list them all, or you can contribute to this page.
animation
Description:
Swing your main or off hand.
사용법:
/animation <mainhand|offhand>
bed
Description:
Allows you to make the bot sleep easily, all about sleeping in one command.
사용법:
Basic usage:
bed leave|sleep <x> <y> <z>|sleep <radius>Examples:
Leave a bed:
/bed leaveSleep in a bed on 124 84 76:
/bed sleep 124 84 76Sleep in a bed using relative coordinates:
/bed sleep ~ ~ ~-2Automatically find a bed in radius of 50 blocks and sleep in it:
/bed sleep 50
blockinfo
Tip
You need to have Terrain And Movements enabled in order for this to work.
Description:
Reports the block type at the given position.
If you use the
-soption it will report the types of blocks around the targeted blokcs.사용법:
Basic usage:
/blockinfo <x> <y> <z> [-s]
bots
Description:
Allows you to list and unload a specific bot or all bots.
Useful when debugging and developing scripts.
사용법:
/bots <list|unload <bot name|all>>Examples:
Unload a bot called CustomScript
/bots unload CustomScriptUnload all bots
/bots unload all
changeslot
Description:
Change your selected slot in the hotbar.
Tip
You need to have Inventory Handling enabled in order for this to work.
사용법:
/changeslot <1-9>
chunk
Description:
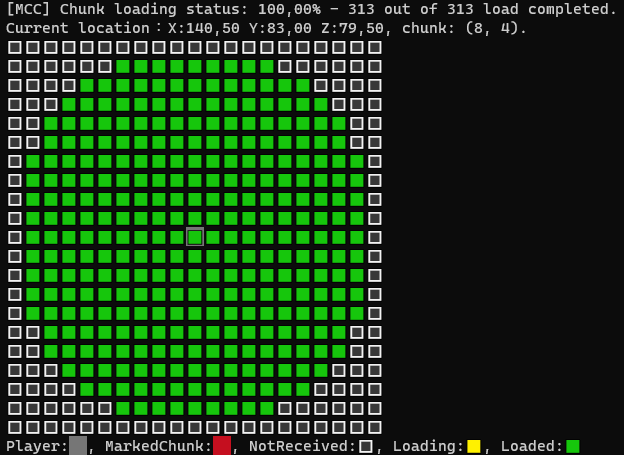
Displays the chunk loading status in a nice way.
Warning
To use this feature you need to enable the Terrain and Movements
Tip
You need a terminal with emoji support, like Powershell 7, Windows Terminal or Alacritty, if you do not want emoji support and want to use cmd or powershell 5, disable emojis with:
enableemoji사용법:
/chunk status [chunkX chunkZ|locationX locationY locationZ]How it looks:

dig
Description:
Dig a block on a specific coordinate.
사용법:
/dig <x> <y> <z>Example:
/dig 127 63 12Using relative coordinates:
/dig ~ ~-1 ~2
dropitem
Description:
Drop all items of a specific type from your inventory.
Tip
You need to have Inventory Handling enabled in order for this to work.
사용법:
/dropitem <itemtype>Tip
All item types can be found here.
Example:
/dropitem diamond
enchant
Tip
You need to have Inventory Handling enabled in order for this to work.
Description:
Allows you to enchant items in an enchanting table.
You need to first open an enchanting table and then place and item that you want to enchant and lapis in the enchanting table, and then you can execute the command.
To open an enchanting table you can use the
useblockcommand.사용법:
Basic usage:
/enchant <top|middle|bottom>
entity
Description:
Attack an entity, use an entity or get a list of entities around you.
Tip
You need to have Inventory Handling and Entity Handling enabled in order for this to work.
사용법:
Basic usage:
/entity <id|entitytype> <attack|use>Get a list of entities around you:
/entityTip
All entity types can be found here.
Examples:
Attack a Zombie:
/entity Zombie attack
execif
Description:
Allows you to execute a command if a specific condition is met.
The condition is a C# expression and the local variables you set using
set,setrndor the configuration file can be used.The condition is always returned as a boolean, so only comparison can be done, if needed cast the expression result to bool.
Also the instance of MCC is available with
MCC..Tip
All local variables are treated as strings in the app, when comparing their values, you can use
<variable> == "<value>", or better use.Equalsmethod사용법:
Basic usage:
/execif <condition (C# expression)> <command>Examples:
Setting a variable and using it:
/set test=Something /execif 'test == "Something"' "send Success!"``` /set test2=1 /execif 'test2 == "1"' "send Success 2!" ```Tip
You can use single quote (
') to wrap your expression if the expression contains double quote (")Adding back-slash (
\) before the double quote will also work (/execif "test == \"Something\"" "send Success!")Basic C# expression:
/execif "1 + 2 + 3 == 6" "send Success!"Using MCC class:
/execif "MCC.GetHealth() == 20.0" "send Success!"Using in combination with
execmulti:/execif "1 == 1" "execmulti send 1 -> send 2 -> send 3"
execmulti
Description:
Allows you to execute multiple commands in succession on a single line, useful for debugging or when using
execifCommands are separated by
->사용법:
Basic usage:
execmulti <command 1> -> <command 2> -> <command 3> -> ...Examples:
/execmulti send 1 -> send 2 -> send 3 -> sneak
quit
Alias:
exitDescription:
Disconnect from the server and close the application
reco
Description:
Disconnect and reconnect to the server
사용법:
/reco [account]Tip
[account]is an account alias defined in accounts file, for more info check out accountlist
reload
Description:
Reloads settings from MinecraftClient.ini and Chat Bots.
Tip
Some settings won't be reloaded since they are used before the client initialization. Also, settings provided by the command line paramteres will be overriden. This also does not reload the ReplayBot due to technical limitations.
사용법:
/reload
connect
Description:
Go to the given server and resume the script
사용법:
/connect <server> [account]Tip
<server>is either a server IP or a server alias defined in servers file, for more info check out serverlistTip
[account]is an account alias defined in accounts file, for more info check out accountlist
script
Description:
Run a script containing a list of commands
사용법:
/script <script name>
send
Description:
Send a message or a command to the server
사용법:
/send <text>
respawn
Description:
Use this to respawn if you are dead (like clicking "respawn" in-game)
사용법:
/respawn
log
Description:
Display some text in the console (useful for scripts)
사용법:
/log <text>Example:
/log this is some text
list
Description:
List players logged in to the server (uses tab list info sent by server)
사용법:
/list
set
Description:
Set a value which can be used as
%variable%in further commands사용법:
/set <variable>=<value>Examples:
/set abc=123
setrnd
Description:
Set a
%variable%randomly to one of the provided values사용법:
/setrnd <variable> string1 "\"string2\" string3"Examples:
/setrnd <variable> -7 to 10(Set a
%variable%to a number from -7 to 10)
sneak
Description:
Toggle sneaking.
사용법:
/Sneak
tps
Description:
Get the server TPS (Ticks Per Second).
사용법:
/tps
useitem
Description:
Use item in the hand, this can be used to do a right click on items which open menus on servers.
Tip
You need to have Inventory Handling enabled in order for this to work.
Warning
The Inventory Handling is currently not supported in
1.4.6 - 1.9사용법:
/useitem
useblock
Description:
Place a block from a hand on a specific coordinate or open an inventory:
- chest/trap chest
- furnace
- brewing stand
- dispenser/dropper
- hopper
- shulker
- loom
Tip
You need to have Inventory Handling and Terrain and Movements enabled in order for this to work.
Tip
Not all inventories have a GUI representation in an ASCII art format.
Warning
The Inventory Handling is currently not supported in
1.4.6 - 1.9.사용법:
/useblock <x> <y> <z>Example:
/useblock 43 72 7
follow
Description:
Make the bot follow a player.
Tip
This command is avaliable only with Follow Player Chat Bot enabled.
Tip
You need to have Inventory Handling enabled in order for this to work.
Tip
You need to have Enity Handling enabled in order for this to work.
사용법:
/follow <player name|stop>Example:
/follow milutinke
wait
Description:
Wait X ticks (10 ticks = ~1 second. Only for scripts)
사용법:
Fixed time:
/wait <time>Random time:
/wait <minimum time> to <maximum time>Tip
You can use
-instead oftoExamples:
/wait 20/wait 20 to 100/wait 20-35
move
Description:
Used for moving when terrain and movements feature is enabled.
Tip
You need to have Terrain and Movements enabled in order for this to work.
Warning
The Terrain and Movements is currently not supported in
1.4.6 - 1.6.사용법:
/move <on|off|get|up|down|east|west|north|south|center|x y z|gravity [on|off]> [-f]: walk or start walking. "-f": force unsafe movements like falling or touching fireExamples:
Enable gravity
/move gravity onMove to coordinates:
/move 125 72 34Move to a center of a block:
/move center
nameitem
Description:
This command allows you to name an item when you have an Anvil inventory open and an item in the first slot (slot number 0),
After you place an item in the first slot of the anvil, use this command, and then do a click on the slot 2 to get an item from the anvil, then do a click on an empty slot in your inventory.
사용법:
/nameitem <name of the item>Example:
/nameitem My super duper sword 2000Full Example with anvil:
# Open an anvil
/useblock 12 74 321

# Click on an axe in slot 12
/inventory container click 12

# Put an axe to the slot 0 in anvil
/inventory container click 0

# Set the new name
/nameitem My fancy axe

# Click on the axe in slot 2 in the anvil
/inventory container click 2

# Put the axe back in your inventory in slot 12
/inventory container click 12

# Close the anvil
/inventory container close
look
Description:
Used for looking at direction when terrain and movements is enabled
사용법:
/look <x y z|yaw pitch|up|down|east|west|north|south>Examples:
/look up/look east
inventory
Description:
Used for inventory manipulation.
Tip
You need to have Inventory Handling enabled in order for this to work.
Warning
The Inventory Handling is currently not supported in
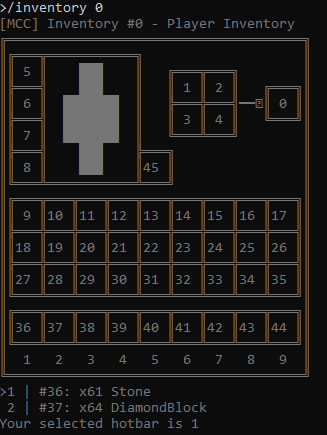
1.4.6 - 1.9.MCC defines inventories as containers internally, so player's inventory, chests, droppers, dispensers, hoppers, chest minecarts, barrels, furnaces, etc... are all considered a container, and each one of them has it's ID, the words container and inventory can be used interchangeably.
Inventory has slots and each one of them has an id.
Tip
This command DOES NOT physically open a container (eg. chest), for that you need to use
useblockcommand first.An example of player inventory with annotated IDs in ASCII art and a list of items:

사용법:
Basic usage:
/inventory <player|container|<id>> <action> [action parameters] | /inventory <inventories/i> | /inventory <search/s> <item type> [amount]Tip
player and container can be simplified with p and c accordingly
Actions:
clickdrop
Show/Preview items in an inventory:
/inventory <player|id>Click/Shift-Click on an item in an inventory:
/inventory <player|container|<id>> <click> <slot id> [left|right|middle|Shift|ShiftRight]Tip
The default click is left click
Close an inventory:
/inventory <player|container|<id>> closeDrop item(s) from an inventory:
/inventory <player|id> drop <slot id> <number of items|all>Tip
To drop all items from a slot, you can use:
allGive an item to the player inventory from a creative menu when in the creative mode:
/inventory creativegive <slot id> <item type> <amount>Tip
To find item types, check out this list
Delete an item from a player's inventory when in the creative mode:
/inventory creativedelete <slot id>Show all available inventories:
/inventory inventoriesSearch for an item of specified type in available inventories:
/inventory search <item type>Examples:
Show player's inventory:
/inventory playerShow/Preview items in an inventory using an id:
/inventory 3Click on an item in player's inventory in slot number/id
36:/inventory player click 36Right-Click on an item in slot number/id
4in an inventory with an id2:/inventory 2 click 4 rightClose an inventory with an id
2:/inventory 2 closeDrop a single item from a player's inventory in slot number/id
36:/inventory player drop 36 1Drop all items from a player's inventory in slot number/id
37:/inventory player drop 37 allGive an item to the player inventory from a creative menu when in the creative mode:
/inventory creativegive 36 diamondblock 64Tip
To find item types, check out this list
Delete an item from a player's inventory in slot number/id
36when in the creative mode:/inventory creativedelete 36Search for 10 Slime Blocks in available inventories:
/inventory s SlimeBlock 10
debug
Description:
Toggle debug messages, useful for chatbot developers.
help
Description:
Show commands help.
Tip
Use "/send /help" for server help
